No Bake Mini Biscoff Cheesecakes
Table of Contents
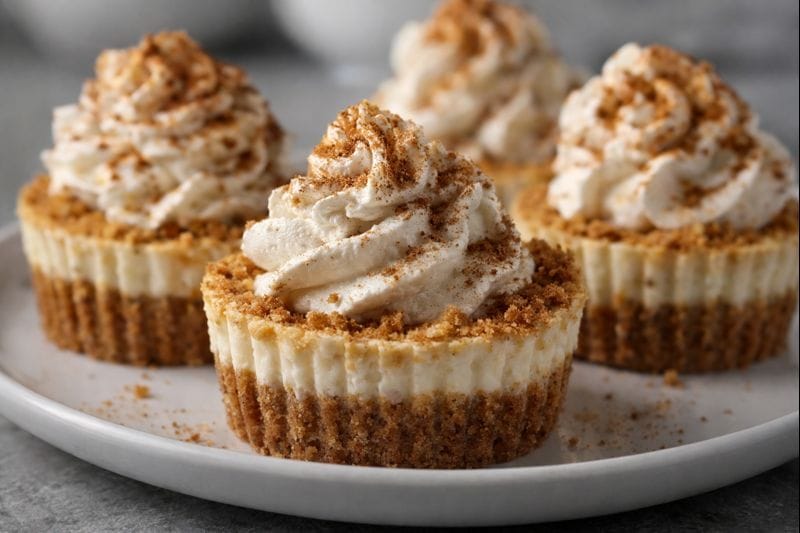
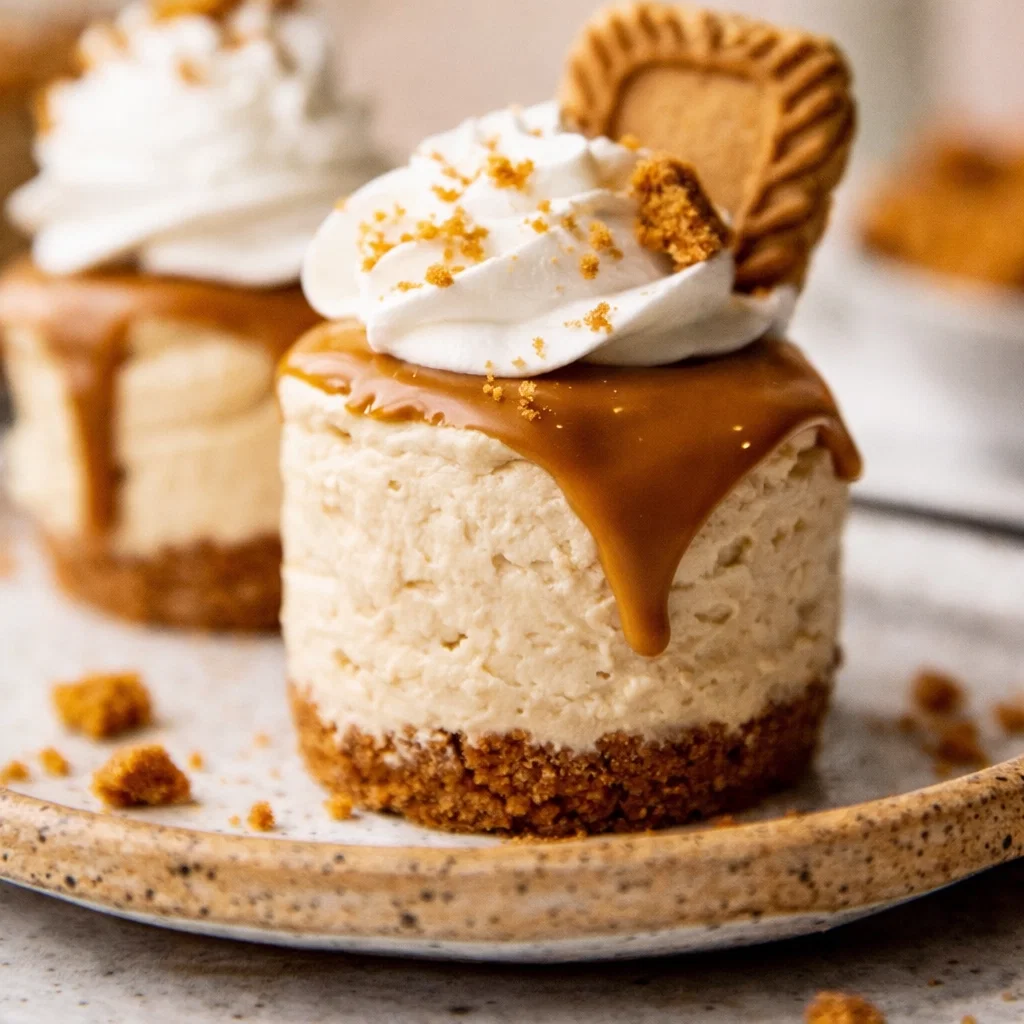
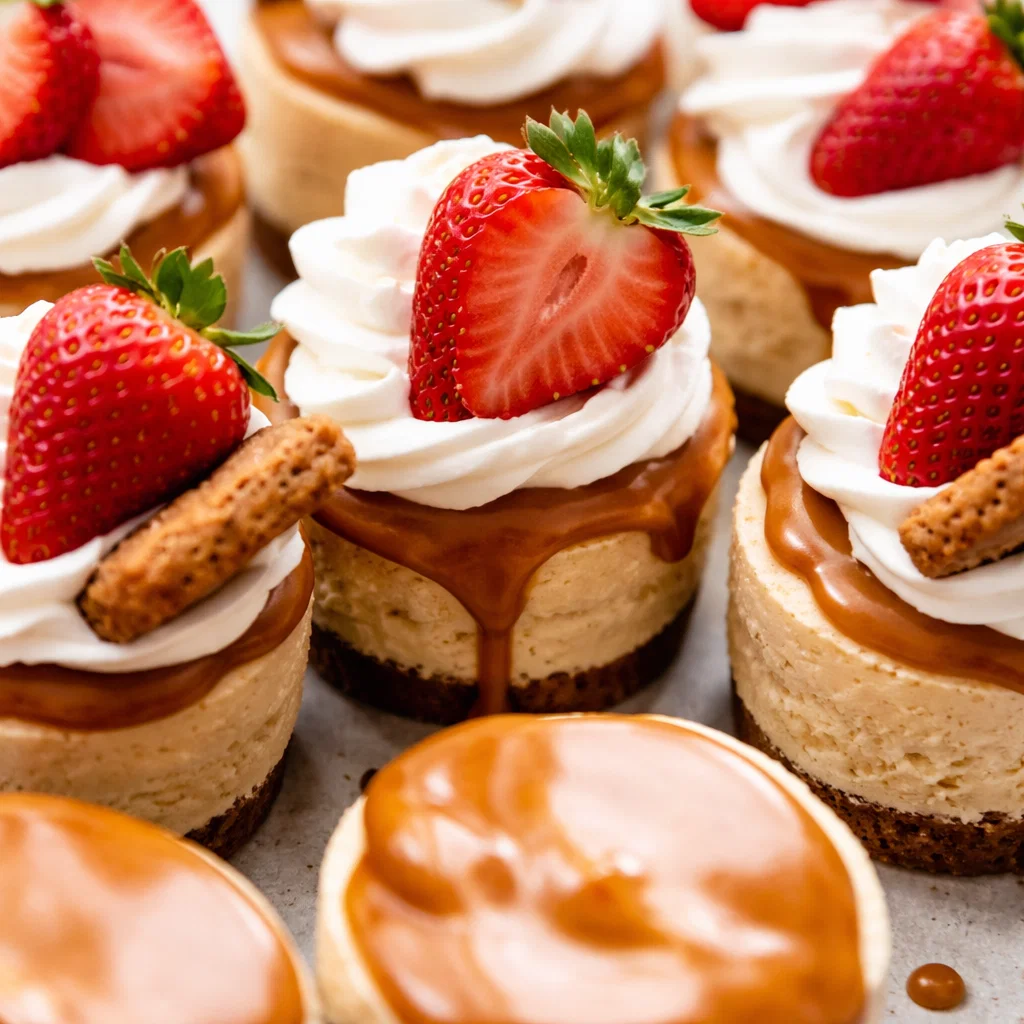
There is a specific flavor profile that stops people mid-bite — the kind that produces a pause, a look of genuine surprise, and the immediate question “what is in this?” These No Bake Mini Biscoff Cheesecakes produce that reaction reliably and consistently. The flavor is warm, complex, and unmistakably distinctive: the cinnamon, ginger, and caramelized cookie butter notes of Lotus Biscoff spread layered into a velvety smooth, lusciously creamy cheesecake filling that sits on a crunchy, buttery Biscoff cookie crust and is finished with a glossy melted Biscoff drizzle, a swirl of whipped cream, and a whole Biscoff cookie standing at attention on top.
Thank you for reading this post, don't forget to subscribe!The visual impact is significant. The flavor is better than the visual impact. And the effort required — no oven, no water bath, no springform pan anxiety, no cracked tops — is genuinely minimal compared to what arrives on the plate.
These easy no bake Biscoff cheesecakes are individual-sized, make-ahead friendly, and built for the occasions that call for something that looks professionally made without requiring professional pastry skill. Once you make them, they become the dessert people specifically request at the next gathering.
Why This Recipe Works
No Oven, No Water Bath, No Stress
The most immediately appealing quality of these no bake mini Biscoff cheesecakes for home bakers of any experience level is the complete absence of oven involvement. Traditional baked cheesecake requires a water bath — a fussy, spill-prone technique involving a springform pan wrapped in multiple layers of aluminum foil sitting inside a larger pan of hot water — to produce the moist, gentle, even heat that prevents cracking. Skip the water bath and the cheesecake cracks. Manage it incorrectly and water seeps through the foil and produces a soggy bottom. This recipe eliminates the entire concern — no oven means no water bath, no cracking, no foil wrapping, no temperature monitoring, and no anxious checking through the oven window.
Individual Portions for Easy Entertaining
The mini Biscoff cheesecake format is a practical advantage for any occasion beyond its visual appeal. Individual portions mean no slicing, no serving utensils required, and no awkward negotiation over who gets the corner piece versus the center piece. Every guest receives their own complete, beautifully finished dessert — their own crust, their own filling, their own drizzle, their own garnish. For dessert tables, holiday parties, birthday celebrations, and dinner parties where presentation and ease of service are both priorities, the individual format delivers in ways that a single large cheesecake cannot.
Make-Ahead for Stress-Free Hosting
These no bake Biscoff cheesecakes require a minimum of 6 hours of refrigeration to set properly — which means they must be made in advance by design, making them the ideal make-ahead dessert for any occasion. Prepare them the evening before the event, refrigerate overnight, add the drizzle and garnish the next morning, and the dessert is completely finished hours before guests arrive. The hosting timeline compression this produces is meaningful — no last-minute dessert preparation, no dessert that needs to be served immediately while other courses are still being managed.
The Texture Secret: Sour Cream
The specific quality that makes the filling of these creamy no bake Biscoff cheesecakes so texturally distinctive — airy and light while remaining thick and velvety — is the addition of sour cream to the cream cheese base. Sour cream’s slight acidity tenderizes the cream cheese mixture and adds a subtle tang that prevents the filling from tasting one-dimensionally sweet, while its moisture content lightens the overall texture to something softer and more mousse-like than a standard cream cheese-only filling. Combined with the whipped heavy cream folded in at the end, the filling achieves the specific texture balance — simultaneously rich and light — that makes each bite so satisfying.
Essential Ingredient Notes
Biscoff Cookies and Butter for the Crust
Use a full 8.8 oz package of Lotus Biscoff cookies for the crust — the complete package produces the right quantity of crumbs for the crust depth that provides structural support for the filling without being too thick to bite through cleanly. Process the cookies in a food processor until they reach fine, even crumbs — no large pieces remaining. Melted butter is the binding agent that transforms the loose crumbs into the slightly sandy, cohesive mixture that presses firmly into the pan cavities and holds together when the cheesecake is unmolded. The ratio of butter to cookie crumbs is calibrated to produce a crust that is firm enough to hold its shape while remaining pleasantly crumbly and buttery rather than hard and dense.
Full-Fat Cream Cheese: Temperature Is Everything
Full-fat block cream cheese — not spreadable cream cheese from a tub — is the correct product for these homemade no bake Biscoff cheesecakes. The higher fat content of block cream cheese provides the richness and body that the filling needs to set firmly during refrigeration. The temperature preparation is equally important: the cream cheese must be softened to full room temperature — a minimum of 60 minutes out of the refrigerator — before mixing begins. Cold cream cheese does not break down and incorporate smoothly regardless of how long it is beaten — it remains in small, dense clumps distributed throughout the filling that produce a lumpy, uneven texture in the finished cheesecake. Room temperature cream cheese beats to a completely smooth, lump-free consistency in seconds.
Cold Heavy Cream: Temperature Works Both Ways
While the cream cheese must be warm, the heavy whipping cream must be the exact opposite — taken straight from the refrigerator immediately before whipping, beaten in a chilled bowl (place the bowl in the freezer for 10 minutes before using), and used immediately after reaching stiff peaks. Cold cream whips significantly more easily and more stably than warm cream — the fat molecules in cold cream form a more efficient, more stable foam structure that produces stiffer peaks and maintains them through the folding process. Cream that has warmed to room temperature whips to softer, less stable peaks that collapse more readily during folding and produce a less structured, less set filling.
Powdered Sugar for a Smooth Finish
Powdered sugar (confectioners’ sugar) is specified over granulated sugar for a specific and important reason: it dissolves instantly and completely in the cream cheese mixture without requiring heat or extended mixing. Granulated sugar’s larger crystals can remain partially undissolved in a no-bake, cold-process filling — producing a slightly gritty texture that undermines the velvety smoothness that is the defining quality of these mini Biscoff cheesecakes. Powdered sugar produces a completely smooth, grittiness-free filling every time.
Lotus Creamy Biscoff Spread: The Star Ingredient
Lotus Creamy Biscoff cookie butter spread is specifically recommended over other cookie butter brands for its particular combination of warm spice notes — cinnamon, ginger, nutmeg, and clove — and its smooth, creamy, peanut butter-like consistency that incorporates into the cheesecake filling without clumping or streaking. The creamy variety blends more smoothly than the crunchy version and produces a more cohesive, uniformly flavored filling. The Biscoff spread appears twice in this recipe — incorporated into the filling for distributed flavor throughout and melted as the finishing drizzle on top for concentrated Biscoff flavor and the glossy visual finish.
Step-by-Step No-Fail Directions
Step 1 — Prepare the Biscoff Cookie Crust
Process the full 8.8 oz package of Lotus Biscoff cookies in a food processor until they reach fine, uniform crumbs with no large pieces remaining — approximately 30 to 45 seconds of continuous processing. Transfer to a bowl and add melted butter, stirring until the mixture resembles damp, sandy crumbs that hold together when pressed between two fingers. Grease the cavities of a mini cheesecake pan or line a standard 12-count muffin tin with paper or silicone liners. Press approximately 1 tablespoon of the crust mixture firmly into each cavity — use the flat bottom of a small measuring cup or shot glass to press the crumbs into a compact, even layer.
Step 2 — The Quick Chill
Place the crust-filled pan in the freezer for 10 to 15 minutes or the refrigerator for 20 to 30 minutes while preparing the filling. This quick chill firms the butter in the crust and allows it to set into a stable base that holds its shape when the filling is piped on top — a soft, unfirmed crust will mix with and destabilize the filling rather than remaining as a distinct separate layer.
Step 3 — Whip the Cold Heavy Cream
In a chilled bowl beat the cold heavy whipping cream with a hand mixer or stand mixer on medium-high speed until stiff peaks form — approximately 2 minutes. Stiff peaks hold their shape when the beaters are lifted and do not fall or curl. Do not over-beat past this stage — over-beaten heavy cream begins to separate toward butter and produces a grainy, broken texture in the finished filling. Set the whipped cream aside in the refrigerator while preparing the cream cheese base.
Step 4 — Make the Creamy Biscoff Base
In a separate large bowl beat the room temperature full-fat cream cheese on medium speed until completely smooth and free of any lumps — approximately 1 minute. Add the powdered sugar, Lotus Creamy Biscoff spread, sour cream, pure vanilla extract, and pinch of salt. Beat on medium speed until all ingredients are fully combined and the mixture is completely smooth, uniform in color, and free of any lumps or streaks — approximately 1 to 2 minutes.
Step 5 — The Gentle Fold
Remove the whipped cream from the refrigerator. Add the whipped cream to the Biscoff cream cheese base in two or three additions — folding gently with a rubber spatula using large, sweeping strokes that travel down through the center of the bowl, across the bottom, and up the opposite side. Rotate the bowl slightly between each stroke. Fold until no white streaks of whipped cream remain visible and the mixture is uniformly colored and textured throughout. Do not stir or beat — folding preserves the air incorporated during whipping that produces the light, airy texture of the finished no bake Biscoff cheesecake filling.
Step 6 — Pipe and Set
Transfer the completed filling to a piping bag fitted with a large round or star tip. Remove the chilled crust-filled pan from the freezer or refrigerator. Pipe the filling into each cavity filling to the top — or slightly above the rim for a domed, bakery-style appearance. Smooth the tops with a small offset spatula if desired. Cover the pan loosely with plastic wrap and refrigerate for at least 6 hours — overnight refrigeration is strongly preferred and produces a more completely set, more flavorful result as the flavors continue to develop and meld during the extended chill.
Assembly and Professional Finishing Touches
The Biscoff Drizzle
After the cheesecakes have set completely remove from the refrigerator. Place the Lotus Creamy Biscoff spread in a small microwave-safe bowl and microwave in 20 to 30 second intervals stirring between each until completely melted and fluid. Allow to cool for 2 to 3 minutes until slightly thickened — thin enough to drizzle or spread but not so hot that it melts the cheesecake surface. Spread or drizzle the melted Biscoff over the surface of each chilled mini Biscoff cheesecake in an even, thin layer. Return to the refrigerator for 15 to 20 minutes until the Biscoff drizzle has set to a firm, glossy cap.
Garnish Immediately Before Serving
Add the final garnishes — a swirl of freshly whipped cream piped from a star tip and a whole Biscoff cookie or a scatter of crushed Biscoff crumbs — immediately before serving rather than in advance. Whipped cream softens and loses its defined shape after more than a few hours in the refrigerator, and the Biscoff cookie garnish absorbs moisture from the whipped cream and softens over time. Both elements look and taste best when applied at the last moment — the contrast between the crisp cookie, the firm Biscoff drizzle, and the creamy filling is at its most dramatic when freshly assembled.
Expert Storage and FAQ
Refrigerator Storage
Store finished no bake mini Biscoff cheesecakes in an airtight container in the refrigerator for up to 4 days. The flavor actually develops and deepens over the first 24 hours as the Biscoff spices permeate through the filling more completely — these are genuinely better on day two than day one, making them an exceptional make-ahead dessert choice.
Freezing for Longer Storage
These mini Biscoff cheesecakes freeze beautifully for up to 3 months — making them an outstanding option for advance preparation weeks before a major event. Freeze without the whipped cream garnish and ideally before adding the Biscoff drizzle. Arrange in a single layer on a parchment-lined baking sheet until individually frozen solid — approximately 2 to 3 hours — then transfer to a freezer-safe airtight container or zip-lock bag. Thaw overnight in the refrigerator before adding the drizzle, whipped cream, and cookie garnish. Do not thaw at room temperature — the filling softens too quickly and unevenly.
Pan Substitutions
Standard 12-count muffin tin: Line each cavity with a paper or silicone muffin liner and proceed exactly as directed. The paper liners peel away cleanly after setting — silicone liners produce the cleanest, most professional-looking sides. 9-inch springform pan: This recipe converts to a single large no bake Biscoff cheesecake using a standard 9-inch springform pan with no ingredient adjustments. Press the full crust mixture into the bottom of the pan in an even layer, add the full filling quantity, and refrigerate for a minimum of 8 hours or overnight for the larger volume to set completely. Release the springform sides, add the drizzle and garnish, and serve in slices.
Complete Recipe Card
No Bake Mini Biscoff Cheesecakes Prep Time: 25 minutes | Chill Time: 6 hours minimum | Total Time: 6 hours 25 minutes | Yield: 12 mini cheesecakes
Ingredients
For the Biscoff Cookie Crust
- 1 full package (8.8 oz) Lotus Biscoff cookies, processed to fine crumbs
- 4 tablespoons unsalted butter, melted
For the Biscoff Cheesecake Filling
- 16 oz full-fat block cream cheese, softened to room temperature
- ½ cup powdered sugar, sifted
- ½ cup Lotus Creamy Biscoff spread
- ¼ cup full-fat sour cream
- 1 teaspoon pure vanilla extract
- Pinch of kosher salt
- 1 cup cold heavy whipping cream
For the Biscoff Drizzle and Garnish
- ¼ cup Lotus Creamy Biscoff spread, melted
- Freshly whipped cream for piping
- 12 whole Biscoff cookies or crushed Biscoff crumbs for garnish
Nutritional Breakdown (Per Mini Cheesecake — Estimated)
| Nutrient | Amount |
|---|---|
| Calories | 385 kcal |
| Total Fat | 28g |
| Saturated Fat | 15g |
| Protein | 4g |
| Carbohydrates | 30g |
| Dietary Fiber | 0.5g |
| Total Sugars | 18g |
| Sodium | 210mg |
All nutritional values are estimates and will vary based on specific ingredient brands and garnish quantities.