Chocolate Mousse Brownies
Table of Contents
Some of the best recipes in existence were not born in professional test kitchens or developed through systematic culinary experimentation. They were born from a late-night text message, a best friend’s specific and slightly demanding dessert request, and the particular kind of creative determination that emerges when someone you care about asks for something that doesn’t quite exist yet. These Chocolate Mousse Brownies began exactly that way — with a request for something that was simultaneously chewy and smooth, rich and airy, indulgent in multiple distinct ways within a single dessert.
Thank you for reading this post, don't forget to subscribe!The first attempt was honest about its limitations. The layers were present but imperfect — the mousse was slightly dense, the ganache uneven, the proportions not yet calibrated to produce the specific result the vision demanded. But the potential was unmistakable, and the iteration that followed produced what is now a three-layer chocolate mousse brownie that has earned a 4.7-star rating and the kind of reader testimonials that use phrases like “10 out of 10” and “made this three times in two weeks.” The evolution from bumpy first try to perfected masterpiece is, in retrospect, exactly the process this dessert deserved.
Community Proof and Recipe Overview
What Readers Are Saying
The community around this easy chocolate mousse brownie recipe has been consistent and enthusiastic in its response — and the specific language readers use in their testimonials reveals precisely what makes this dessert so compelling. The 4.7-star rating across hundreds of reviews reflects not just satisfaction but genuine enthusiasm — the kind that produces repeat baking and unprompted sharing. “10 out of 10” appears in multiple independent reviews. “The best brownie I have ever made” appears in several more. For a dessert with three distinct layers and a technique that spans multiple preparation stages, this level of consistent positive response is a meaningful indicator of how approachable and how rewarding the recipe genuinely is.
The Anatomy of Three Perfect Layers
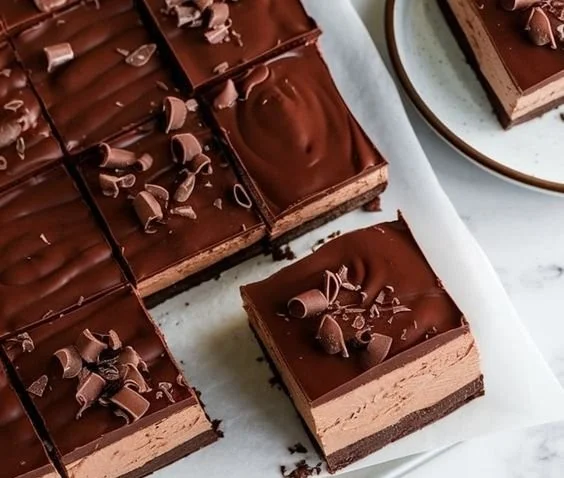
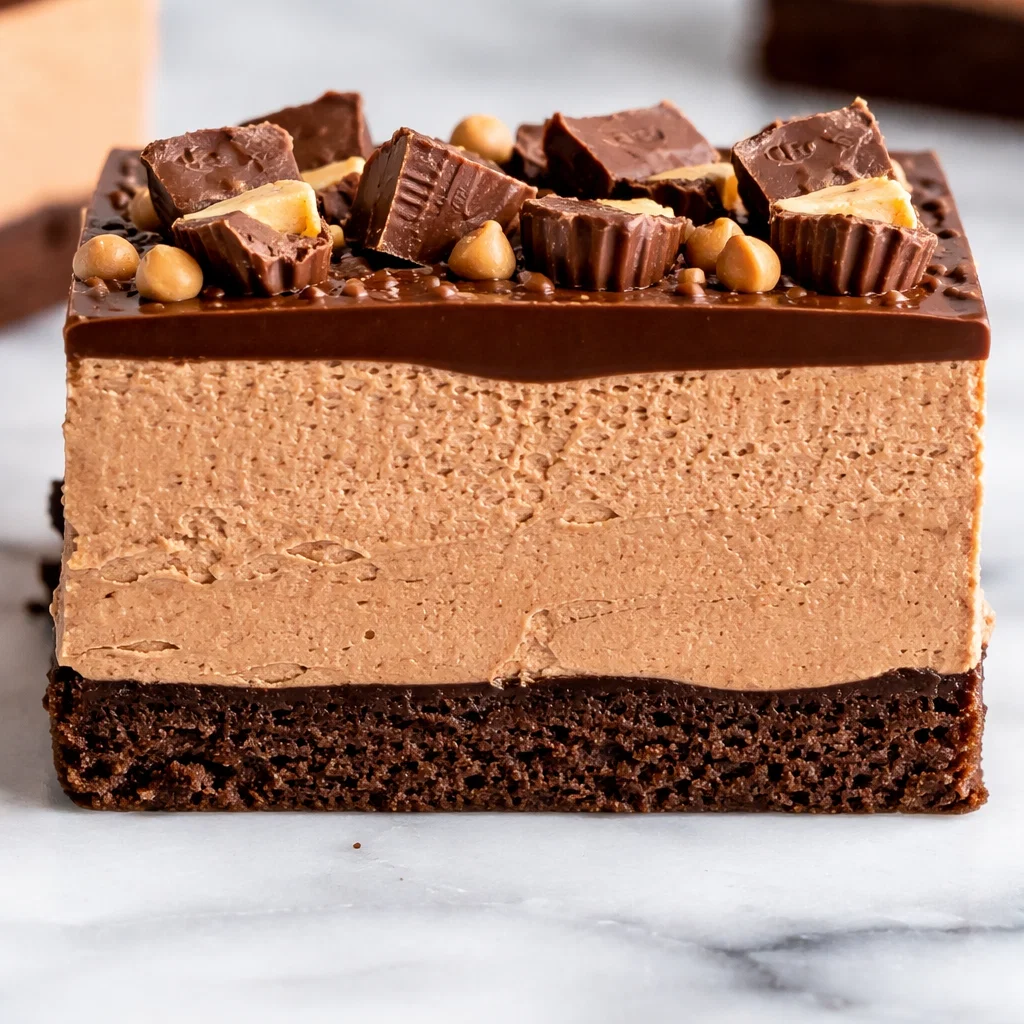
These layered chocolate mousse brownies are built from three distinct components that each contribute something the others don’t — and together produce a cross-section that is genuinely dramatic and unmistakably impressive.
Layer 1 — The Fudgy Brownie Base is the structural and textural foundation: dense, intensely chocolatey, chewy at the edges and slightly fudgy at the center, with the satisfying substance that makes a brownie worth eating on its own. It provides the weight and richness that the lighter layers above need to feel grounded and complete.
Layer 2 — The Airy Chocolate Mousse is the middle layer that provides the textural contrast that makes this dessert so compelling — the cloud-light, melt-on-contact softness of a properly made chocolate mousse sitting directly on top of the dense brownie creates a combination that no single-texture dessert can replicate.
Layer 3 — The Glossy Ganache Finish is the sleek, shiny cap that completes the presentation and adds a concentrated, slightly bittersweet chocolate intensity that ties the whole dessert together. It sets to a firm but yielding finish that produces a clean, satisfying cut.
Perfect for Every Occasion
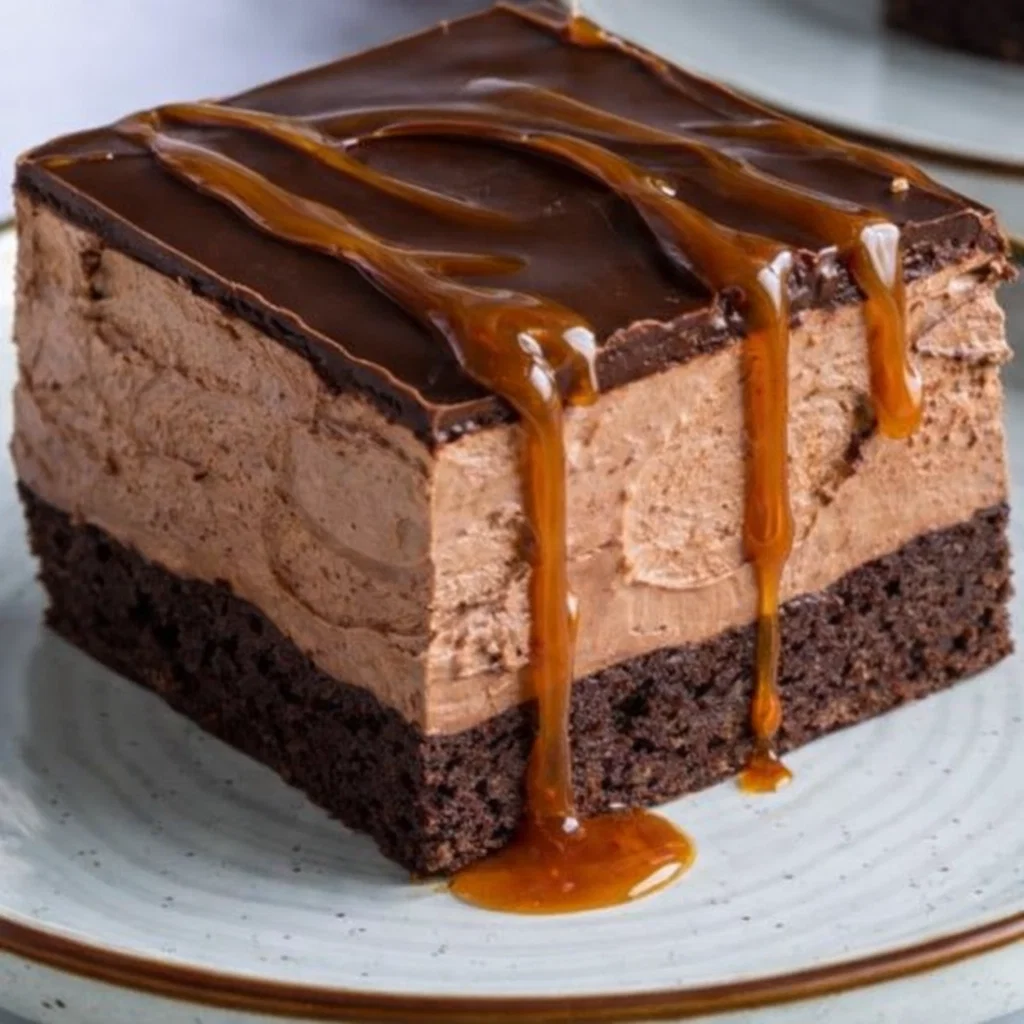
These holiday chocolate mousse brownies are an ideal dessert choice for occasions that call for something genuinely impressive without requiring professional pastry skill. The make-ahead nature — the entire dessert actually benefits from overnight refrigeration — makes them particularly practical for Thanksgiving, Christmas, and any gathering where advance preparation reduces day-of stress. The visual impact of the three-layer cross-section when cut and plated is significant enough to generate genuine table conversation.
Ingredient Mastery and Tips
Quality Matters
The ingredient quality in these fudgy chocolate mousse brownies directly and meaningfully impacts the finished result in a way that is not always true of more complex, heavily spiced or sauce-dependent desserts. When a recipe is essentially a celebration of chocolate in three distinct formats — baked, aerated, and ganached — the quality of that chocolate is the most important variable.
Rich, high-quality cocoa powder — Dutch-process if available — provides the deep, complex chocolate flavor in the brownie base. Standard grocery store cocoa produces an acceptable result; premium cocoa produces a noticeably more intense, more interesting brownie. Fresh, high-quality butter contributes richness and flavor to both the brownie base and the ganache. Fresh baking powder — check the expiration date and replace if more than 6 months past opening — ensures the brownie base has the lift it needs to produce the correct texture.
Precision in Measuring
Flour and cocoa must be measured with precision in this homemade chocolate mousse brownie recipe — both are ingredients where excess quantity directly causes the primary failure mode of the brownie base: a dry, crumbly, dense result that lacks the fudgy character the recipe is designed to produce. Use the spoon-and-level method — spoon flour or cocoa into the measuring cup rather than scooping directly from the container, then level the top with a straight edge. Scooping directly packs the powder and can add 20 to 30% more than the recipe intends.
Ingredient Substitutions
When baking chocolate is unavailable — the unsweetened or semi-sweet bar chocolate required for both the mousse and the ganache — semi-sweet chocolate chips substitute effectively at the same quantity with one important caveat: chocolate chips contain stabilizers that make them slightly more resistant to melting cleanly. Chop them finely before melting to help them melt more completely and smoothly, and add a small additional teaspoon of neutral oil to the ganache if the texture seems thicker than desired.
Layer 1: The Fudgy Brownie Base
The Mixing Method: Gentle Is the Goal
The texture of the brownie base in these chocolate mousse brownies is determined as much by mixing technique as by ingredient ratios — and the technique is built around minimizing gluten development to keep the crumb fudgy and tender rather than tough and cakey.
Begin by whisking the wet ingredients — melted butter, sugar, eggs, and vanilla — together until the mixture is completely smooth and slightly pale, approximately 1 to 2 minutes of vigorous whisking. This thorough emulsification of the wet ingredients creates the silky, cohesive base that the dry ingredients fold into. Then add the dry ingredients — flour, cocoa, salt, and baking powder — and fold gently with a spatula using as few strokes as possible until just combined with no dry pockets remaining. Overmixing at this stage develops gluten, tightens the crumb, and produces a tough, cakey brownie rather than the dense, fudgy base this recipe requires. Stop folding the moment the dry ingredients disappear into the batter.
Baking Specifics
Pour the brownie batter into a greased 8×8 inch baking pan lined with parchment paper (using the parchment sling technique for clean removal). Bake at 350°F (175°C) for the time specified in the recipe — begin checking at the earliest suggested time using the moist crumb toothpick test: insert a toothpick into the center of the pan and it should emerge with moist, fudgy crumbs attached but no wet uncooked batter. A clean toothpick indicates over-baking — the brownie has already passed its optimal fudgy window.
Cooling: Complete and Non-Negotiable
Allow the brownie base to cool completely in the pan before adding the mousse layer — this is not a step that can be rushed or abbreviated. A warm brownie base melts the chocolate mousse as it is spread, destroying the distinct layering that is central to the entire dessert concept. Cool at room temperature for at least 1 hour, or accelerate the process by placing the pan in the refrigerator for 30 minutes after 30 minutes of room temperature cooling.
Layer 2: The Airy Chocolate Mousse
The Melting Secret: Steam and Patience
The mousse layer begins with a technique that produces a smoother, more stable chocolate base than direct melting: finely chopped chocolate combined with just 3 tablespoons of steaming hot milk. The small quantity of hot milk creates enough heat to melt the finely chopped chocolate without a double boiler or microwave — stir continuously from the outside in as the chocolate softens and the milk and chocolate come together into a smooth, fluid base. The fine chopping is essential — larger chocolate pieces will not melt completely in this small volume of liquid.
Whipped Cream Technique
In a separate chilled bowl beat cold heavy whipping cream with a hand mixer or stand mixer on medium-high speed until soft peaks form — the cream should hold a gentle curve when the beaters are lifted but not stand in stiff, dry peaks. Slightly under-whipped cream folds into the chocolate more smoothly and produces a more elegant, silky mousse texture than cream beaten to stiff peaks, which can produce a slightly grainy result.
Preventing Seizing: The Tempering Technique
The most common failure point in combining chocolate and whipped cream — and the technique that prevents it — is temperature differential management. When cold whipped cream contacts warm melted chocolate directly, the temperature shock can cause the chocolate to seize into grainy, uneven clumps rather than blending smoothly.
The solution is two-part. First, ensure the melted chocolate has cooled to room temperature but remains fluid before beginning to combine. Second, before adding the bulk of the whipped cream, fold a small scoop — approximately 2 tablespoons — of the whipped cream into the chocolate and stir gently until fully incorporated. This “tempers” the chocolate — raising its temperature slightly and introducing some fat from the cream — making it receptive to the remaining cream without seizing. Add the remaining whipped cream in two or three additions, folding gently with a spatula using large, sweeping strokes that preserve the air incorporated during whipping.
Setting the Mousse Layer
Spread the completed chocolate mousse in an even layer over the completely cooled brownie base — use an offset spatula for the smoothest, most even result. Cover the pan loosely with plastic wrap and refrigerate for at least 2 hours until the mousse is fully set and firm enough to support the ganache layer without it sinking through.
Layer 3: The Glossy Ganache Finish
Patience in Preparation
The ganache that tops these triple layer chocolate brownies is made through a deceptively simple process that requires one specific kind of patience: do not stir immediately. Pour the hot heavy cream over the finely chopped chocolate in a heatproof bowl and allow the hot cream to sit undisturbed for 3 to 5 minutes — the residual heat of the cream gradually melts the chocolate from the outside in. Stirring immediately before the chocolate has softened produces a grainy, broken ganache; waiting for the chocolate to soften fully before beginning to stir produces a perfectly smooth, glossy result. Begin stirring from the center outward in small, gentle circles, gradually expanding until the ganache is completely smooth.
Application and Final Chill
Allow the ganache to cool for 5 to 10 minutes until it thickens slightly from its initial fluid consistency — it should still be pourable but with enough body to coat the mousse surface rather than running off the edges. Drizzle over the set mousse layer and use an offset spatula or the back of a spoon to spread it into an even, thin, glossy layer that covers the entire surface. Return the pan to the refrigerator for 1 hour until the ganache has firmed to a set, glossy cap that holds its shape cleanly when cut.
Scaling and Make-Ahead Advice
The 9×13 Conversion
To double this chocolate mousse brownie recipe for larger gatherings, use a 9×13 inch baking pan and double all ingredient quantities for all three layers. Adjust the brownie base baking time to 24 to 28 minutes — the greater volume of batter in the larger pan takes longer to set. If the edges begin to darken before the center is done, create a foil tent — a loose sheet of aluminum foil draped over the pan without touching the surface — to deflect direct heat from the edges while allowing the center to finish cooking.
Glass Pan Adjustment
If a glass or ceramic baking dish is used rather than the standard metal pan, reduce the oven temperature to 325°F — glass conducts heat more slowly and concentrates it at the edges, which can produce overly firm, tough edge brownies while the center remains underdone at the standard 350°F. The lower temperature distributes the heat more evenly and produces consistent texture throughout.
The Overnight Advantage
These make-ahead chocolate mousse brownies are genuinely better the day after they are made — a rare quality that makes them exceptionally practical for entertaining. Overnight refrigeration allows the three layers to meld together slightly at their boundaries, the mousse to firm to its ideal silky-but-set consistency, and the flavors throughout all three layers to deepen and develop. Prepare the complete dessert the evening before serving, cover tightly, and refrigerate overnight.
Serving and Presentation
The Warm Knife Trick
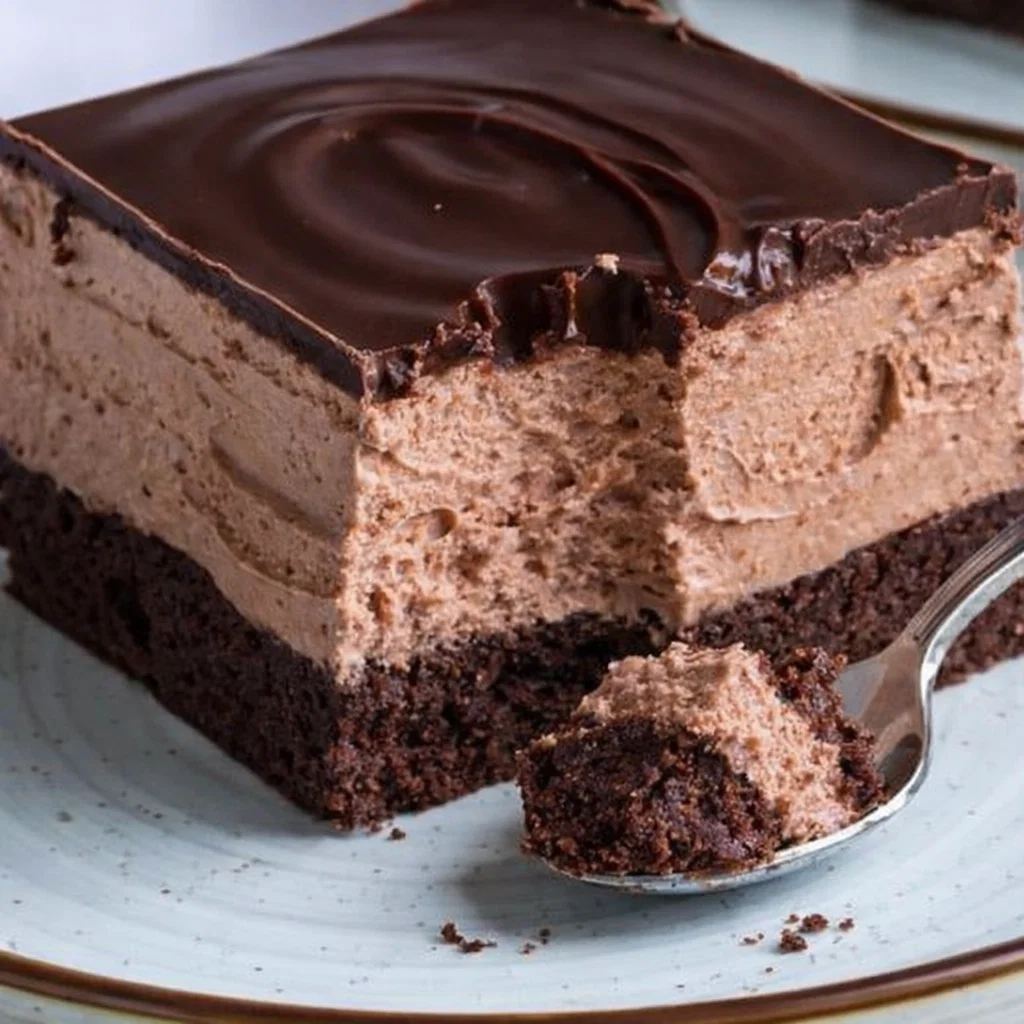
For the clean, professional cross-section cuts that showcase the three distinct layers — the visual payoff of all the preparation effort — use the warm knife technique. Fill a tall glass or narrow container with hot water and submerge the blade of a sharp chef’s knife for 30 seconds. Remove and wipe completely dry with a clean kitchen towel. Make the cut with the warm dry blade — the gentle warmth allows it to glide through the ganache and mousse layers cleanly without cracking or dragging. Repeat the warm-and-dry process before each cut for the cleanest edges on every piece.
Pairing Suggestions
These decadent chocolate mousse brownies are rich enough to be served as a standalone dessert with no accompaniment required — but several pairings elevate the experience further. Strong black coffee or espresso provides bitter contrast that makes the sweetness of all three layers taste more interesting and balanced. Fresh berries — raspberries and strawberries specifically — add bright acidity and color contrast that makes the plated dessert look more elegant. A small dollop of extra whipped cream alongside each piece provides a cool, light counterpoint to the dense richness of the brownie and the ganache.
Recipe Card and Nutrition
Chocolate Mousse Brownies Prep Time: 45 minutes | Cook Time: 25 minutes | Chill Time: 3 hours | Total Time: 4 hours 10 minutes | Yield: 9 to 12 servings
Ingredients
Layer 1 — Fudgy Brownie Base
- ½ cup unsalted butter, melted
- 1 cup granulated sugar
- 2 large eggs, room temperature
- 1 teaspoon pure vanilla extract
- ⅓ cup all-purpose flour, spooned and leveled
- ½ cup high-quality cocoa powder, spooned and leveled
- ¼ teaspoon kosher salt
- ¼ teaspoon baking powder
Layer 2 — Airy Chocolate Mousse
- 4 oz semi-sweet baking chocolate, finely chopped
- 3 tablespoons whole milk, steamed to just below boiling
- 1 cup cold heavy whipping cream
Layer 3 — Glossy Ganache
- 4 oz semi-sweet baking chocolate, finely chopped
- ½ cup heavy cream, heated until steaming
Nutritional Breakdown (Per Serving — Based on 9 Pieces)
| Nutrient | Amount |
|---|---|
| Calories | 726 kcal |
| Total Fat | 48g |
| Saturated Fat | 29g |
| Protein | 7g |
| Carbohydrates | 68g |
| Dietary Fiber | 4g |
| Total Sugars | 52g |
| Sodium | 125mg |
All nutritional values are estimates and will vary based on specific chocolate brand, cream fat content, and portion size.
Storage: Store covered in the refrigerator for up to 4 days. The flavor and texture actually improves through day 2 as the layers continue to meld. Bring to room temperature for 15 minutes before serving for the best texture — ganache that is too cold becomes brittle rather than yielding.