Caramel Apple Cheesecake Bars
Table of Contents
I. The Ultimate Caramel Apple Cheesecake Bars Overview
Some recipes are good. Some recipes are the ones people ask about at every gathering, the ones that get handwritten on index cards and passed along to anyone who dares ask for them. Caramel Apple Cheesecake Bars fall firmly into that second category — and once you understand what goes into them, it is easy to see why.
Thank you for reading this post, don't forget to subscribe!These bars are a four-layer masterpiece, and every single layer earns its place on the pan.
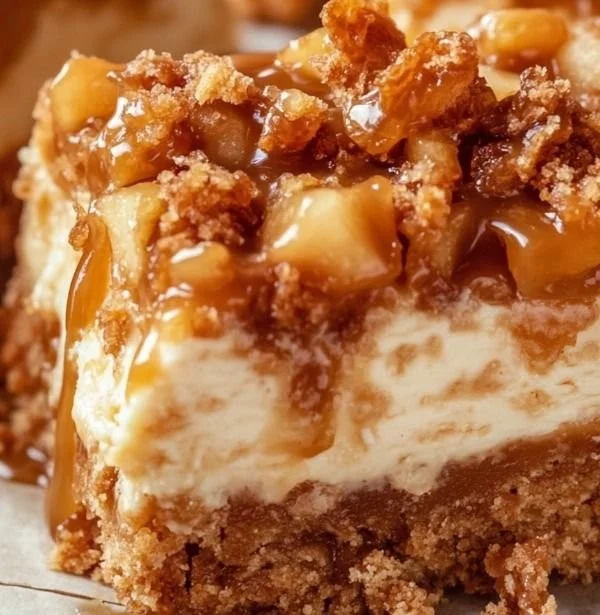
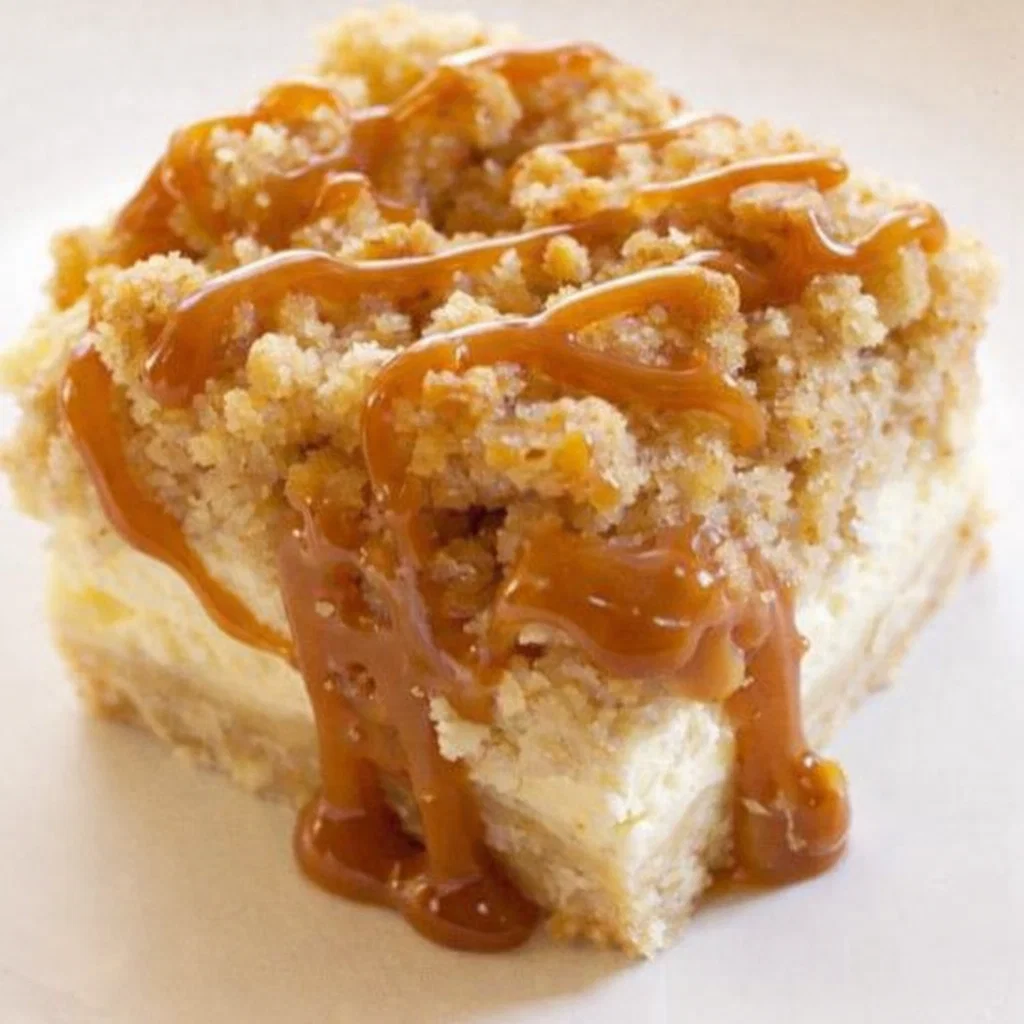
It starts with a buttery shortbread crust — dense, golden, and rich in a way that sets the tone for everything above it. On top of that crust sits a thick, creamy cheesecake filling, smooth and tangy and generous enough to hold its own against the layers it supports. Then comes a layer of cinnamon-seasoned apples, chopped fine and warmly spiced with cinnamon and nutmeg, filling the kitchen with the kind of aroma that makes people wander in from other rooms to ask what is baking. The whole thing is crowned with a buttery oat streusel that bakes into a golden, crumbly, irresistible topping. And just before serving? A pour of thick, glossy caramel sauce that ties every layer together into one extraordinary bite.
The Signature Modification That Makes This Recipe Better
This Caramel Apple Cheesecake Bars recipe was originally adapted from a Paula Deen recipe — a classic that home bakers have loved for years. But one meaningful change elevates it above the original: the cheesecake filling has been increased by 1.5 times the original quantity.
Why? Because the shortbread crust in this recipe is substantial, and the streusel and apple topping are generous. A standard-sized cheesecake layer gets lost between those two elements, leaving the bars feeling crust-heavy and unbalanced. The increased filling creates the thick, prominent cheesecake layer that these bars deserve — one that holds its own against the crust below and the topping above, so that every bite delivers all four layers in proper proportion.
Yield and Occasion
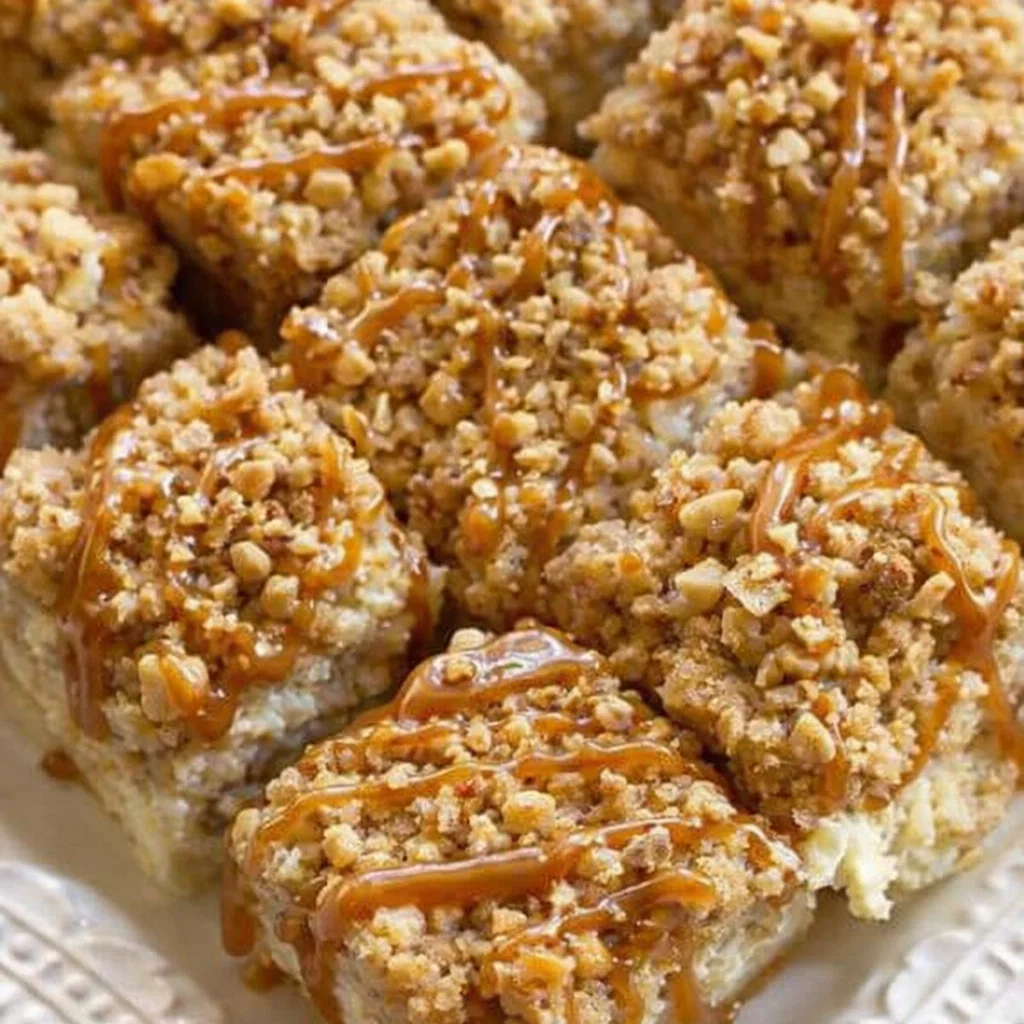
This recipe is baked in a standard 9×13-inch pan and produces 24 bars — which makes it one of the most practical and crowd-friendly dessert recipes in existence. Caramel Apple Cheesecake Bars are ideal for holiday gatherings, Thanksgiving dessert tables, potlucks, school events, office parties, or any occasion where you need to feed a crowd with something genuinely impressive. They travel well, slice cleanly after chilling, and look spectacular on a serving platter.
II. Essential Pro Tips for Perfect Caramel Apple Cheesecake Bars
Before you preheat the oven, take five minutes to read through these pro tips. Each one addresses a real potential problem and, more importantly, tells you exactly how to avoid it.
The Parchment Paper Rule: Non-Negotiable for Easy Removal
The shortbread crust in this recipe is dense, buttery, and deeply pressed into the pan — which means it has every intention of sticking to whatever surface it is baked on. To prevent this, line your 9×13 baking dish with parchment paper or heavy-duty aluminum foil before you do anything else. Leave enough overhang on the sides to act as handles, and press the lining into the corners as smoothly as possible.
This step serves two purposes. First, it ensures that the baked bars release cleanly from the pan without tearing the crust or leaving the bottom layer behind. Second, those overhanging edges allow you to lift the entire slab of Caramel Apple Cheesecake Bars out of the pan in one piece and transfer it to a cutting board for slicing — which gives you cleaner, more uniform cuts and a much more professional-looking result.
The 24-Hour Chill Rule: Patience Pays Off
It is technically possible to eat these Caramel Apple Cheesecake Bars once they have cooled to room temperature. Technically. But if you want bars that slice cleanly, hold their shape beautifully, and have that perfectly set cheesecake texture that makes each layer distinct and defined, you need to refrigerate them for a minimum of 24 hours before cutting and serving.
This is not an exaggeration and it is not optional if presentation matters to you. The chilling time allows the cheesecake filling to fully firm up, the crust to solidify, and all four layers to settle into each other in a way that makes slicing — and eating — a completely different and dramatically better experience than cutting into them warm or even just a few hours after baking.
Plan ahead. Make these bars the day before you need them. Future you will be extremely grateful.
Make-Ahead Strategy: Built for Busy Hosts
One of the greatest practical advantages of this Caramel Apple Cheesecake Bars recipe is how naturally it accommodates advance preparation. You can bake the entire recipe a full day in advance, cover the pan tightly with plastic wrap, and refrigerate it overnight without any loss of quality. In fact, as noted above, the 24-hour chill actually improves the result.
The only step to hold back is the caramel drizzle. Add the caramel sauce just before serving — not before storage — to preserve the texture and visual appeal of the topping. Caramel drizzled hours in advance can seep into the streusel and lose its glossy, dramatic finish. Keep it separate and drizzle right before the bars hit the table for maximum impact.
III. Ingredient Deep Dive & Substitutions
Understanding why each ingredient was chosen — and what you can swap when needed — gives you the confidence to make this Caramel Apple Cheesecake Bars recipe your own.
The Best Apples for Cheesecake Bars
Granny Smith apples are the unambiguous first choice for this recipe. Their firm texture holds up beautifully during baking without turning to mush, and their natural tartness provides a critical counterpoint to the sweetness of the cheesecake filling, streusel, and caramel. Without that tartness, the bars can lean overly sweet — even cloying. Granny Smith keeps everything in balance.
That said, apple variety is one of the most flexible elements of this recipe. Cosmic apples work well as an alternative, offering a slightly sweeter, more complex flavor that still holds up during baking. Other firm varieties like Honeycrisp, Braeburn, or Pink Lady can also be used successfully. The key is to avoid soft, mealy apple varieties — like Red Delicious — that will break down completely in the oven and turn the apple layer into an unpleasant mush rather than the tender, distinct cinnamon-spiced layer this recipe calls for.
Oat Options for the Streusel
The streusel topping calls for quick-cooking oats, which absorb moisture quickly and bake into a tender, cohesive topping that clumps beautifully. If quick-cooking oats are not available, rolled oats (old-fashioned oats) work equally well. The texture of the finished streusel will be slightly heartier and more rustic with rolled oats — which many bakers actually prefer. What you want to avoid is instant oats, which are too finely processed and will not provide the toothsome texture that makes the streusel layer worth eating.
Butter and Caramel Sauce
For the shortbread crust, you can use either salted or unsalted butter — the choice here genuinely comes down to personal preference. Salted butter adds a subtle savory contrast that some bakers find enhances the overall flavor of the crust, while unsalted butter gives you more control over the total salt content of the bars. Either works.
For the caramel finishing drizzle, the quality of your caramel sauce makes a visible difference in the final result. A thick, high-quality store-bought caramel sauce — Mrs. Richardson’s is a widely recommended option — pours beautifully and sets to a glossy finish. If you have time and inclination, a homemade salted caramel sauce adds another layer of depth and richness that takes these Caramel Apple Cheesecake Bars from excellent to extraordinary.
IV. Equipment & Step-by-Step Assembly
Required Tools
Before you begin, gather the following:
A 9×13-inch baking dish is the foundation of this recipe — the size is not flexible, as the layer ratios are calibrated for this specific pan. An electric hand mixer or stand mixer is essential for beating the cream cheese filling to the smooth, lump-free consistency that makes cheesecake bars worth eating. And a pastry blender is the right tool for cutting butter into both the shortbread crust mixture and the streusel topping — though two forks or clean fingertips work as acceptable alternatives if a pastry blender is not available.
Layer 1: The Shortbread Crust
In a large bowl, combine all-purpose flour and brown sugar, whisking to distribute the sugar evenly. Using your pastry blender (or fingertips), cut in cold butter until the mixture resembles coarse crumbs. Transfer the mixture to your parchment-lined 9×13 pan and press it firmly and evenly across the entire bottom surface, right to the edges and corners.
Pre-bake the crust at 350°F for 15 minutes, until it is lightly golden around the edges and just set in the center. This par-baking step is essential — it gives the shortbread crust time to firm up before the wet cheesecake filling is added on top, preventing the crust from becoming soggy during the full bake. Remove from the oven and allow to cool slightly while you prepare the next layer.
Layer 2: The Cheesecake Filling
Using your electric mixer, beat full-fat brick cream cheese and granulated sugar together on medium speed until completely smooth — no lumps, no streaks, just a silky, uniform filling. Scrape down the sides of the bowl as needed. Add the eggs one at a time, mixing on low speed just until each egg is incorporated before adding the next. Add the vanilla extract and mix briefly to combine.
Pour the cheesecake filling over the warm pre-baked crust and spread it gently and evenly with a spatula. The layer should be thick and level — this is the heart of your Caramel Apple Cheesecake Bars and deserves careful attention.
Layer 3: The Cinnamon Apples
Peel, core, and finely chop your Granny Smith apples — smaller pieces distribute more evenly across the pan and ensure that every bar gets a proper proportion of the apple layer. In a bowl, toss the chopped apples with granulated sugar, ground cinnamon, and a pinch of ground nutmeg until every piece is evenly coated. Spoon the seasoned apples over the cheesecake filling, spreading them as evenly as possible across the entire surface.
The cinnamon and nutmeg combination here is classic for good reason — together they create the warm, spiced flavor that makes these bars taste unmistakably like autumn, regardless of what time of year you make them.
Layer 4: The Oat Streusel Topping
Combine flour, brown sugar, quick-cooking oats, cinnamon, and cold butter in a bowl. Here is an important technique note: incorporate the butter by hand rather than with a mixer or pastry blender. Using your fingers to press and pinch the butter into the dry ingredients gives you more control over the final texture, allowing you to create clusters and clumps without over-processing the oats into a fine powder. The streusel should hold together in irregular, rough clusters — not be a uniform, fine crumb.
Sprinkle the streusel evenly over the apple layer, covering as much of the surface as possible.
The Final Bake
Return the assembled pan to the oven and bake at 350°F for 40 to 45 minutes, until the streusel is deeply golden, the apple layer is tender, and the cheesecake filling is visibly set around the edges. The center may have a very slight jiggle — this is fine, as it will firm up during chilling. Allow the Caramel Apple Cheesecake Bars to cool completely in the pan before covering and refrigerating for at least 24 hours.
V. Variations & Storage
Individual Servings: The Cupcake Method
For parties, school events, or any occasion where individual servings are more practical than sliced bars, this recipe adapts beautifully to silicone cupcake trays. Press a small amount of crust mixture into the bottom of each silicone cup, followed by a spoonful of cheesecake filling, a few pieces of cinnamon apple, and a small pinch of streusel on top.
This method produces 24 individual Caramel Apple Cheesecake cups — perfectly portioned and easy to serve without slicing. The streusel quantity needed for this method is only about one-third of the full recipe amount, so you can scale back accordingly. The baking time also decreases to approximately 30 minutes at 350°F. Keep a close eye on the cups in the final few minutes, as individual portions bake faster and more unevenly than a full pan.
Refrigeration
Store baked Caramel Apple Cheesecake Bars in an airtight container in the refrigerator for up to 5 days. Keep the caramel sauce stored separately and drizzle individual servings just before eating to maintain the best texture and presentation throughout the storage period.
Freezing Instructions
These bars are exceptional candidates for freezing, making them one of the best make-ahead desserts for holiday season baking. After the bars have fully chilled and set in the refrigerator, slice them into individual portions, wrap each bar tightly in plastic wrap, and place them in a freezer-safe zip-lock bag or airtight container. Caramel Apple Cheesecake Bars freeze beautifully for up to 4 months.
When ready to serve, thaw the bars overnight in the refrigerator or at room temperature for a couple of hours. One critical note: do not add the caramel drizzle before freezing. Caramel sauce does not freeze and thaw gracefully — it can become grainy or separate. Always add the caramel drizzle fresh, after the bars have thawed and just before serving.
From the first press of shortbread into the pan to the final glossy pour of caramel sauce, every step of this recipe is deliberate and every layer is worth it. Caramel Apple Cheesecake Bars are the kind of dessert that earns a permanent place in your seasonal baking rotation — the recipe you make every fall, the one that gets requested by name, and the one you will find yourself making in the middle of summer simply because you cannot wait until October.