Honey Garlic Shrimp: The Best Healthy Dinner in 20 Minutes
Table of Contents
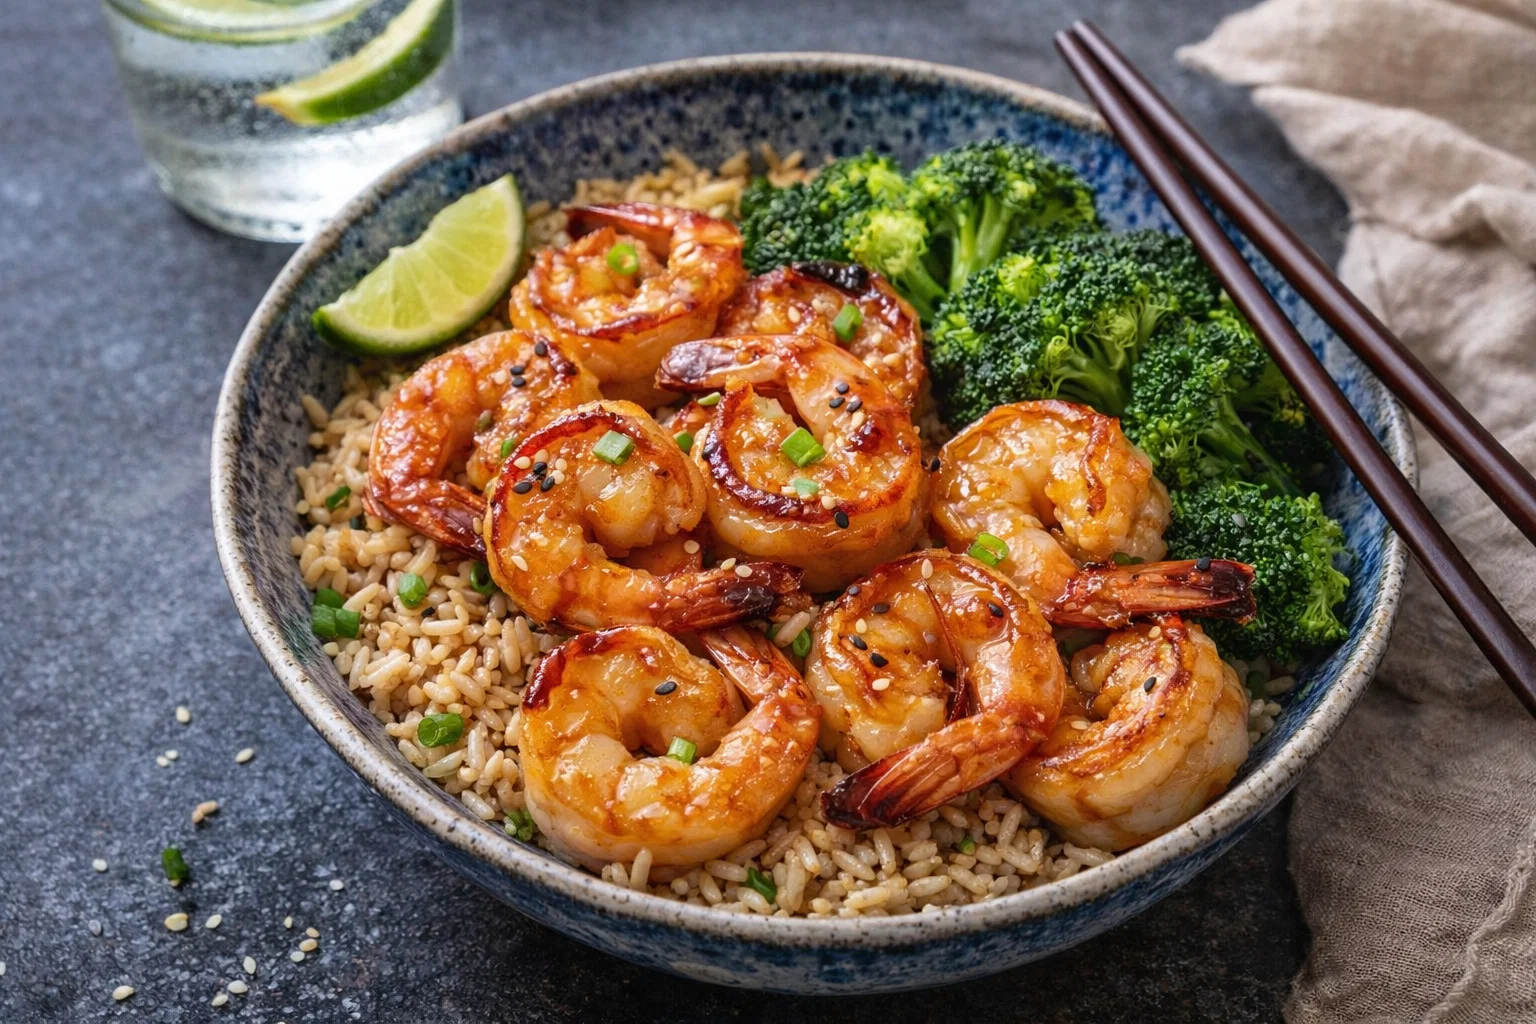
This Honey Garlic Shrimp recipe is a reader favorite for good reason — sweet, sticky, garlicky shrimp seared in five minutes over a caramelized honey garlic sauce that doubles as the marinade. Serve over brown rice, steamed broccoli, or a fresh salad for the ultimate healthy weeknight dinner.
Thank you for reading this post, don't forget to subscribe!I. The Ultimate Weeknight Meal That Earns Its Reputation
Some recipes earn the title of reader favorite through novelty or spectacle. This Honey Garlic Shrimp recipe earned it through consistency — the kind of consistent, reliable, weeknight-deliverable deliciousness that keeps home cooks coming back to the same recipe week after week because it simply never lets them down.
It is extra quick. It is genuinely simple. And the flavor it delivers from four core ingredients — honey, soy sauce, garlic, and shrimp — is completely disproportionate to the effort involved. That gap between effort and reward is what makes this Honey Garlic Shrimp the recipe that readers describe as a “regular in my rotation” more than any other.
The Healthy Weeknight Dinner That Does Not Feel Like a Compromise
The word “healthy” in the context of weeknight dinner often implies sacrifice — something plain, something boring, something you eat because you should rather than because you genuinely want to. This Honey Garlic Shrimp is the rare recipe that is legitimately, measurably healthy and simultaneously the most exciting thing on the dinner table.
Shrimp is one of the highest protein-to-calorie proteins available — lean, fast-cooking, and genuinely flavorful in a way that chicken sometimes is not. The honey garlic sauce uses real honey rather than refined sugar, real garlic rather than artificial flavoring, and soy sauce in a quantity that seasons without loading the dish with excessive sodium. The result is a dinner that is high in protein, low in fat, and made from ingredients without a single artificial component.
Serve it over steamed brown rice for a complete, satisfying bowl. Serve it over roasted or steamed vegetables for a lower-carb option. Pile it on a fresh salad with the extra sauce as the dressing for a meal that feels restaurant-worthy in under twenty minutes. This Honey Garlic Shrimp is the healthy dinner that people actually look forward to eating.
II. Why This Recipe Works: The Science of Simplicity
The Secret Flavor: Caramelized Honey and Garlic Bits
The defining flavor moment of this Honey Garlic Shrimp recipe happens in the pan during the final 60 to 90 seconds of cooking — and it is important enough to understand before you start.
When the reserved honey garlic sauce hits the hot pan alongside the cooking shrimp, the honey begins to caramelize at the pan’s surface. Small, deeply flavored bits of caramelized honey and garlic develop where the sauce contacts the pan’s hottest points — and these bits are the concentrated flavor core of the entire dish. Do not leave them behind. Use the shrimp and a spatula to scrape every bit of caramelized sauce from the pan and toss it with the shrimp before plating. These caramelized bits are what give this Honey Garlic Shrimp its characteristic sticky, complex, deeply sweet-savory quality that plain sauce stirred into the pan could never achieve.
This is the detail that explains why this recipe tastes noticeably better than it has any right to from such a short ingredient list.
The Marinade-as-Sauce Trick: One Bowl, Maximum Efficiency
The single most efficient technique in this Honey Garlic Shrimp recipe is the deliberate division of the marinade into two equal portions before the shrimp ever enters the bowl:
Half goes into the marinade bowl with the raw shrimp, infusing flavor into the protein during the 15-minute rest time.
Half is set aside as the cooking sauce — poured into the pan in the final stage of cooking to create the sticky, glossy glaze that coats every shrimp just before serving.
This approach means you have prepared exactly one component — the honey garlic sauce — and it performs double duty as both the flavoring agent for the raw shrimp and the finishing sauce for the cooked dish. No additional sauce preparation. No extra bowl. No second set of measurements. The efficiency is not incidental; it is the design.
Critical safety note: Never use the used marinade — the portion that contained raw shrimp — as the cooking sauce. Always set aside the reserved half before adding the shrimp to the marinade bowl. The reserved sauce, which never touched raw seafood, is what goes into the pan.
The 20-Minute Timeline: How It Actually Works
15 minutes of hands-off marinating time during which you can prepare your sides, set the table, or simply stand there appreciating that dinner is essentially making itself.
5 minutes of active cooking time — genuinely five minutes, not five minutes plus ten more of prep that gets hidden in a footnote. Shrimp cook faster than any other protein. The sauce caramelizes in seconds. The entire pan cooking process for this Honey Garlic Shrimp is complete before most proteins have even reached a safe internal temperature.
Total: 20 minutes from the moment you open the refrigerator to the moment you set the plate on the table.
III. Video Tutorial: See the Sauce Consistency in Action
Before you begin making this Honey Garlic Shrimp, watch the step-by-step video tutorial embedded below. The video is particularly valuable for two specific visual cues that are difficult to convey in text alone:
The sauce consistency at each stage — how the honey garlic mixture looks when freshly whisked versus after it has begun to caramelize in the hot pan, and what the ideal glossy, coating finish looks like on the cooked shrimp.
Why you do not need to pat the shrimp dry after marinating — a question that comes up repeatedly from readers accustomed to other pan-searing techniques. The video shows exactly what happens to the moisture level of the marinated shrimp and why the slight moisture from the marinade actually aids the caramelization process rather than preventing it. Watch before cooking and the technique will make complete sense.
(Video embed placeholder — add your step-by-step Honey Garlic Shrimp video here)
IV. Ingredients and Smart Substitutions
The Essentials
The Shrimp:
- 1 lb raw shrimp, thawed, peeled,
  and deveined (fresh or frozen)
- Large or jumbo shrimp are preferred
  (16/20 or 21/25 count per pound)

The Honey Garlic Sauce:
- 3 tbsp honey (raw or regular)
- 2 tbsp low-sodium soy sauce
- 2 cloves fresh garlic, minced
  (substitute: 1 tsp jarred minced garlic)
- 1 tsp fresh ginger, grated (optional
  but adds a warm, aromatic depth)

For Cooking:
- 1 tbsp olive oil

For Garnish:
- 2 green onions (scallions), thinly sliced

The Shrimp: Fresh vs. Frozen, and What Size to Use
Raw shrimp — not pre-cooked — is the correct starting point for this Honey Garlic Shrimp recipe. Pre-cooked frozen shrimp that is reheated in the pan becomes rubbery and tough almost immediately; the goal here is to cook the shrimp from raw in the honey garlic sauce so it absorbs the flavor while developing the correct texture. If using frozen raw shrimp, thaw completely in a bowl of cold water for 15 to 20 minutes, then peel and devein before proceeding.
Size matters for this recipe: larger shrimp (labeled 16/20 or 21/25, which indicates the count per pound) have more surface area for the sauce to cling to, stay more tender during the brief high-heat cooking, and present more impressively on the plate. Smaller shrimp cook faster and risk overcooking in the time it takes the sauce to caramelize.
Garlic: Fresh vs. Jarred
2 fresh garlic cloves, minced as finely as possible, is the ideal form for this Honey Garlic Shrimp recipe — fresh garlic has a brightness and bite that develops into a mellower, sweeter depth as it caramelizes in the honey sauce.
1 teaspoon of jarred minced garlic substitutes directly in equal flavor if fresh garlic is not available. It produces a slightly less vibrant result but is entirely acceptable and significantly faster on nights when every second counts.
Protein Swaps: The Marinade Works for More Than Shrimp
The honey garlic marinade in this recipe is not exclusive to shrimp — it produces equally excellent results on other proteins:
Chicken breast, cut into 1-inch cubes or pounded thin, marinates beautifully in this sauce for 30 minutes to 2 hours and cooks in the same pan with the same technique, requiring only a longer cooking time (6 to 8 minutes per side for whole breasts, 4 to 5 minutes for cubed pieces). The caramelized honey garlic crust on chicken is outstanding.
Salmon fillets — the richness of the fish pairs extraordinarily well with the sweet, garlicky sauce. Marinate for 15 to 30 minutes (no longer, as the acid in soy sauce begins to cure fish at extended times) and sear skin-side down first for 4 minutes before flipping and adding the reserved sauce.
Cooking Method Variations
Pan-searing in olive oil over medium-high heat — as described in the step-by-step below — is the primary method and produces the best caramelization of the honey garlic sauce.
Grilling this Honey Garlic Shrimp on skewers over high heat for 2 to 3 minutes per side produces an awesomely delicious alternative — the char from the grill grates interacts with the honey in the marinade to create a smoky, caramelized crust that has a completely different but equally excellent character. Baste with the reserved sauce during the last minute of grilling.
V. Pro Tips for the Perfect Sauce and Texture
Thickening the Sauce: The Cornstarch Slurry Option
The honey garlic sauce in this Honey Garlic Shrimp recipe naturally thickens as it caramelizes during cooking — but some readers prefer an even thicker, glossier, more restaurant-style sauce consistency. For that result, add a cornstarch slurry at the sauce stage:
Mix 1 teaspoon of cornstarch with 1 teaspoon of cold water in a small bowl until completely smooth. When you add the reserved sauce to the pan in Step 3, pour the cornstarch slurry in simultaneously and stir quickly. The sauce will thicken dramatically within 30 to 60 seconds of contact with the heat, coating every shrimp in a glossy, clingy glaze that is noticeably more substantial than the natural reduction alone.
Do not add the slurry to the marinade — the cornstarch will cloud the raw sauce and prevent it from penetrating the shrimp properly during marinating.
Flavor Balancing: Two Small Additions That Make a Difference
Salt and black pepper directly on the shrimp just before they go into the pan — not in the marinade, but applied dry immediately before cooking — provides a seasoning layer that balances the sweetness of the honey and the savoriness of the soy sauce. The marinade seasons the interior of the shrimp; the salt and pepper season the exterior surface that contacts the pan and develops the first layer of flavor.
For a more complex, Asian-inspired flavor profile that takes this Honey Garlic Shrimp in a slightly more sophisticated direction: add ½ teaspoon of rice vinegar to the sauce for brightness and acidity, and a ½ teaspoon of toasted sesame oil stirred in off-heat just before serving for a nutty, aromatic depth that is unmistakably distinctive and genuinely excellent.
The Steam Prevention Question: Why You Skip Patting Dry
Many pan-searing recipes — particularly for proteins — instruct you to pat the surface completely dry before it goes into the hot pan, on the theory that surface moisture creates steam that prevents browning. This Honey Garlic Shrimp recipe deliberately skips that step, and the video tutorial shows exactly why.
The slight moisture from the marinade clinging to the shrimp’s surface is primarily composed of honey and soy sauce rather than plain water. This mixture does not steam in the same way that water does — instead, it begins to caramelize on contact with the hot pan, contributing to rather than preventing the development of the flavorful sauce. Watch the video tutorial before starting to see this process in real time and understand what you are looking for in the pan during those first critical seconds of cooking.
VI. Step-by-Step Process: How to Make Honey Garlic Shrimp
Step 1 — Whisk the Sauce
In a medium bowl, combine the honey, low-sodium soy sauce, minced garlic, and grated fresh ginger if using. Whisk together until the honey is fully dissolved into the soy sauce and the garlic and ginger are evenly distributed throughout.
Step 2 — Divide and Marinate
Divide the sauce equally into two portions. Set one half aside in a separate small bowl or container — this is your cooking sauce and it should never come into contact with the raw shrimp. Pour the other half into the medium bowl and add the peeled, deveined raw shrimp. Toss to coat evenly. Cover and marinate for at least 15 minutes at room temperature, or up to 8 to 12 hours in the refrigerator for make-ahead convenience and maximum flavor penetration.
Step 3 — Sear and Sauce
Heat 1 tablespoon of olive oil in a large skillet over medium-high heat until shimmering. Season the marinated shrimp lightly with salt and black pepper immediately before adding them to the pan. Add the shrimp in a single layer — do not crowd the pan. Cook for 1 to 1.5 minutes without moving until the underside is pink and slightly golden.
Flip each shrimp. Pour the reserved sauce (not the used marinade) into the pan directly over the shrimp. The honey will begin to bubble and caramelize immediately. Cook for an additional 1 to 2 minutes, using tongs or a spatula to toss the shrimp in the thickening sauce and scrape any caramelized bits from the pan surface into the sauce. Cook until every shrimp is pink and curled into a loose “C” shape — a tight curl into an “O” shape means overcooked.
Step 4 — Garnish and Serve
Remove from heat immediately. Transfer to a serving plate or individual bowls over brown rice, vegetables, or salad. Garnish generously with sliced green onions. Serve immediately — this Honey Garlic Shrimp is best eaten fresh from the pan when the sauce is at its most glossy and the shrimp are at peak tenderness.
VII. Meal Prep and Perfect Side Dish Pairings
Make-Ahead Marinating: Up to 12 Hours in Advance
The single most powerful time-saving strategy for this Honey Garlic Shrimp recipe is extended marinating: prepare the sauce, divide it, add the shrimp to the marinade portion, and refrigerate for up to 8 to 12 hours before cooking. On a busy weeknight, this means all the active preparation happens the previous evening or the morning before work. When dinner time arrives, the only step remaining is the 5-minute pan cooking — making the total active time at dinner zero to three minutes if your sides are also prepped.
This make-ahead marinating also produces noticeably more deeply flavored shrimp — the honey and garlic penetrate more completely during an extended soak, and the finished Honey Garlic Shrimp has a more complex, layered flavor than the 15-minute quick-marinate version.
The Perfect Side Dishes for Soaking Up the Sauce
The honey garlic sauce in this recipe is genuinely too good to leave in the pan — which means your side dish selection should be specifically chosen to absorb and showcase it:
Quick-cook brown rice — microwaveable pouches cook in 90 seconds and are genuinely indistinguishable from stovetop-cooked rice in the context of a bowl covered in honey garlic sauce. Pile the rice high, spoon the shrimp and all accumulated pan sauce directly over it, and stir. Every grain absorbs the sweet, garlicky, caramelized sauce.
Steamed broccoli is the quintessential companion to this Honey Garlic Shrimp — the florets catch the sauce in their crevices and the mild, slightly bitter flavor of steamed broccoli provides the ideal counterpoint to the sweetness of the honey. Steam for 4 minutes in the microwave with a tablespoon of water in a covered bowl.
A fresh salad — romaine or mixed greens with sliced cucumber, shredded carrot, and thinly sliced red onion — turns this into a Honey Garlic Shrimp Salad where the extra pan sauce functions as the dressing. Spoon every drop over the greens and toss.
VIII. Official Honey Garlic Shrimp Recipe Card
⭐⭐⭐⭐⭐ 5 Stars — Reader Favorite
Prep Time: 15 minutes (marinating) Cook Time: 5 minutes Total Time: 20 minutes Yield: 4 servings
Ingredients
- 1 lb raw shrimp, thawed, peeled,
  and deveined (large or jumbo — 16/20 count)
- 3 tbsp honey
- 2 tbsp low-sodium soy sauce
- 2 cloves fresh garlic, minced
  (or 1 tsp jarred minced garlic)
- 1 tsp fresh ginger, grated (optional)
- 1 tbsp olive oil
- Salt and black pepper (to season shrimp
  just before cooking)
- 2 green onions (scallions), sliced
  for garnish

Optional Pro Additions:
- 1 tsp cornstarch + 1 tsp cold water
  (for thicker, glossier sauce)
- ½ tsp rice vinegar
  (for Asian-inspired brightness)
- ½ tsp toasted sesame oil
  (stirred in off-heat for nutty depth)
Instructions
Step 1 — Make the Sauce: Whisk honey, low-sodium soy sauce, minced garlic, and ginger together in a bowl until honey is fully dissolved.
Step 2 — Divide and Marinate: Pour half the sauce into a separate container and set aside (this is your reserved cooking sauce — do not let it contact raw shrimp). Add shrimp to the bowl with the remaining half. Toss to coat. Marinate for 15 minutes at room temperature or up to 12 hours refrigerated.
Step 3 — Sear: Heat olive oil in a large skillet over medium-high heat. Season marinated shrimp lightly with salt and pepper. Add to pan in a single layer. Cook 1 to 1.5 minutes without moving until underside is pink.
Step 4 — Add the Sauce: Flip shrimp. Pour the reserved sauce into the pan (never the used marinade). If using, add the cornstarch slurry simultaneously. Toss shrimp in the caramelizing sauce for 1 to 2 minutes, scraping up all caramelized bits from the pan. Cook until shrimp are pink, slightly curled, and coated in a glossy glaze.
Step 5 — Garnish and Serve: Remove from heat. Serve immediately over brown rice, steamed broccoli, or fresh salad. Garnish with sliced green onions.
Important Recipe Notes
Food Safety — Used Marinade: Always discard the marinade that contained raw shrimp. Only the reserved half — set aside before the shrimp was added — is safe to use as the cooking sauce.
Pre-Cooked Frozen Shrimp: If you only have pre-cooked shrimp, reduce cooking time dramatically — add them to the pan for 30 to 45 seconds per side only, just long enough to heat through and coat in the sauce. Overcooking pre-cooked shrimp produces a rubbery, tough result. Raw shrimp is strongly preferred for best texture.
Doneness Check: Shrimp is cooked when it turns from translucent gray to opaque pink and curls into a loose “C” shape. An “O” shape means it has been overcooked and will be rubbery.
IX. Reader Community: Real Results and Creative Variations
What Home Cooks Are Doing With This Recipe
The Honey Garlic Shrimp recipe community has produced some genuinely inspired adaptations that are worth knowing about before you start:
Feeding kids: Parents consistently report that this is one of the rare shrimp recipes that children eat enthusiastically — the sweetness of the honey makes the flavor accessible to younger palates, and the sticky glaze on each shrimp makes them fun to eat. Reduce the soy sauce to 1 tablespoon and increase the honey to 4 tablespoons for a child-friendly version that leans sweeter.
The sheet pan method: Several readers have adapted this Honey Garlic Shrimp recipe to a sheet pan format — marinated shrimp spread on a sheet pan alongside broccoli florets, bell pepper strips, and snap peas, roasted at 400°F for 10 to 12 minutes. The reserved sauce is drizzled over everything in the final 2 minutes. The result is a complete one-pan dinner with the same honey garlic flavor profile and zero stovetop cooking required.
Double batch strategy: The most common comment from repeat makers of this recipe is that a single pound of shrimp is never enough. Many readers now automatically double the recipe — same sauce quantities doubled, two pounds of shrimp — and either serve a larger crowd or use the leftovers the following day over a different base (salad on day one, rice on day two).
Share Your Version
If this Honey Garlic Shrimp made it into your weeknight rotation — or if you tried the grilled version, the chicken adaptation, the sheet pan method, or a variation of your own — leave a star rating and review in the comments below. The most useful feedback includes what sides you served it with, any ingredient swaps you made, and who you made it for. Your variations inspire the next cook who finds this recipe and wonders what to do with it.
Twenty minutes, four ingredients, and a pan that smells like the best possible version of a weeknight dinner. This Honey Garlic Shrimp recipe is the one that makes you wish you had made a bigger batch — every single time.