Grilled Cheese Burrito
Table of Contents
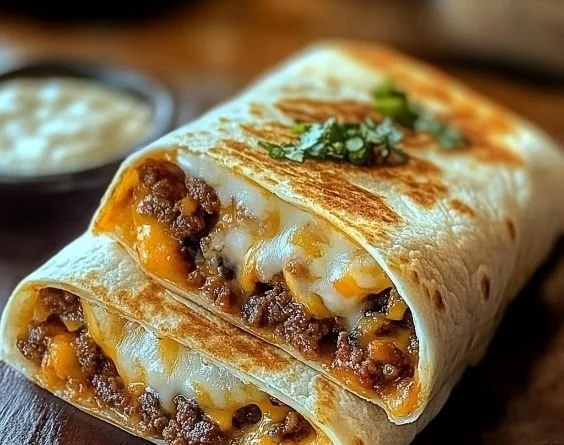
A crispy, golden Grilled Cheese Burrito loaded with smoky chipotle beef, fire-roasted tomato rice, and a zesty chipotle crema — made at home with fresher ingredients, more flavor, and a fraction of the cost.
Thank you for reading this post, don't forget to subscribe!I. A Healthier Fast-Food Favorite You Can Make at Home
There are fast-food items that exist purely out of convenience, and then there are fast-food items that genuinely haunt you. The Grilled Cheese Burrito falls firmly into the second category. That crackling, golden cheese crust on the outside. The smoky, spiced beef filling inside. The creamy chipotle sauce that pulls everything together. It is the kind of meal that makes you genuinely reconsider your relationship with the drive-thru — not because it is a guilty pleasure, but because it is just that good.
This homemade Grilled Cheese Burrito recipe takes everything that makes the fast-food original craveable and takes it to the next level. It starts with fresher, higher-quality ingredients that you choose and control. It uses significantly less oil than anything produced at commercial scale. And the flavor — built from a homemade taco seasoning blend, chipotle peppers in adobo sauce, and a from-scratch chipotle crema — is deeper, more complex, and more satisfying than anything that comes wrapped in a paper bag through a drive-thru window.
This is not a pale imitation of a fast-food favorite. This is the version you make when you want the real thing done right.
II. Why This Grilled Cheese Burrito Recipe Works
Cost-Effective Without Cutting Corners
A single fast-food Grilled Cheese Burrito costs several dollars and delivers exactly one serving. Making this recipe at home produces four full, generously filled burritos using pantry staples and affordable proteins for a fraction of the per-serving cost. Ground beef, rice, canned fire-roasted tomatoes, and a handful of spices are among the most budget-friendly ingredients in any kitchen — and they produce results that are considerably better than what you would get from the drive-thru.
Fully Customizable to Your Taste
One of the most significant advantages of making a Grilled Cheese Burrito at home is complete control over every element of the recipe. Want more heat? Add extra chipotle peppers or a pinch of cayenne to the seasoning blend. Prefer a different protein? Shredded chicken, seasoned ground turkey, or black beans all work beautifully as substitutes for the ground beef. Want to load up on extras? A spoonful of guacamole, a drizzle of nacho cheese sauce, or a handful of pickled jalapeños can all be folded in without anyone stopping you. The drive-thru cannot offer that.
Meal-Prep Friendly for Busy Weeks
This Grilled Cheese Burrito recipe was built with practicality in mind. The filling components — the seasoned beef, the fire-roasted tomato rice, and the chipotle crema — all store exceptionally well in the refrigerator, and the assembled burritos can be wrapped and refrigerated for up to three days. When lunch or dinner needs to happen quickly, a pre-assembled burrito reheated in a skillet or air fryer delivers the same crispy cheese crust and hot, flavorful filling as a freshly made one. Meal prep has rarely tasted this good.
III. The Ingredient Breakdown
Understanding why each ingredient was chosen helps you make confident substitutions and build the best possible Grilled Cheese Burrito every time.
The Protein: 80% Lean Ground Beef
80% lean ground beef is the recommended choice for this recipe, and the reasoning is straightforward. Ground beef with a 20% fat content has the best flavor balance — enough fat to keep the meat juicy and richly flavored during cooking, but not so much that the filling becomes greasy and heavy. Leaner ground beef (90% or higher) tends to cook up drier and less flavorful, while fattier blends can make the burrito feel overly oily.
The key step after browning is to drain the excess grease thoroughly before adding the seasoning blend. This keeps the filling well-flavored and moist without the burrito becoming soggy from accumulated fat.
The Rice: Long-Grain Varieties for the Best Texture
Not all rice behaves the same way in a burrito filling, and texture matters here. Long-grain rice varieties — Jasmine and Basmati in particular — cook up fluffy and distinct, with individual grains that stay separate rather than clumping together. This textural quality is important inside a Grilled Cheese Burrito because it prevents the filling from becoming dense and pasty, and it ensures that the rice layer contributes lightness rather than heaviness to every bite.
The Secret Heat: Chipotle Peppers in Adobo Sauce
This is the ingredient that separates a genuinely great Grilled Cheese Burrito from a generic beef-and-rice wrap. Chipotle peppers in adobo sauce — available in small cans in the international aisle of most grocery stores — provide a deeply smoky, mildly spicy, complex heat that cannot be replicated with chili powder alone. The chipotle peppers are dried, smoked jalapeños rehydrated in a tangy, slightly sweet adobo sauce, and even a small amount transforms a dish dramatically. They appear in both the seasoned beef filling and the chipotle crema, giving the entire Grilled Cheese Burrito a cohesive, signature smokiness from the inside out.
Fresh Additions That Elevate the Filling
The difference between a good burrito and a great one often comes down to a few fresh elements added at the right moment. Red onions — either finely diced raw or quickly sautéed — bring a sharp, slightly sweet bite that cuts through the richness of the beef and cheese. Fresh cilantro adds a bright, herbal note that lifts the entire filling. And a squeeze of fresh lime juice over the finished filling right before assembly wakes up every other flavor in the bowl, adding the acidic brightness that makes a well-built burrito taste complete and alive rather than flat and heavy.
IV. The Signature Components
The Homemade Taco Seasoning Blend
Store-bought taco seasoning works in a pinch, but the homemade blend used in this Grilled Cheese Burrito recipe is genuinely superior — more nuanced, less salty, and fully adjustable to your taste. Combine the following:
- Garlic powder — savory depth and aromatic warmth
- Ground cumin — earthy, slightly smoky backbone of the blend
- Chili powder — mild heat and rich red color
- Smoked paprika — additional smokiness that complements the chipotle
- Dried oregano — subtle herbal complexity
- Salt and black pepper — to balance and amplify every other element
Mix the spices together and store any unused portion in a sealed jar. This blend works equally well on chicken, shrimp, roasted vegetables, and any other protein you might use as a Grilled Cheese Burrito filling variation.
Fire-Roasted Tomato Rice
This is not plain white rice. The rice in this Grilled Cheese Burrito recipe is simmered for 18 to 20 minutes directly in a mixture of canned fire-roasted tomatoes and a portion of the homemade taco seasoning blend, absorbing the smoky, slightly sweet tomato flavor as it cooks. The result is a deeply flavored, beautifully colored rice that tastes far more complex than its simple preparation would suggest. Fire-roasted tomatoes — as opposed to regular canned tomatoes — have a subtle char flavor that adds another dimension of smokiness throughout the entire burrito filling.
Pro tip: Swap the water in your rice recipe for chicken broth to add even more depth and savory richness to every grain.
Zesty Chipotle Crema
The chipotle crema is the soul of this Grilled Cheese Burrito, and it is one of the easiest sauces you will ever make. Combine sour cream, honey, chipotle peppers in adobo sauce, fresh lime juice, and fresh cilantro in a blender or food processor and blitz until completely smooth. The result is a creamy, tangy, smoky sauce with a gentle heat that builds gradually and a sweetness from the honey that keeps it from becoming overpowering. It serves double duty in this recipe — as a component folded inside the burrito during assembly and as a dipping sauce served warm on the side. Make a double batch. You will want more of it on everything.
V. Step-by-Step Assembly & Grilling the Perfect Burrito
Layering the Filling
Warm your large flour tortillas briefly — 20 to 30 seconds in a dry skillet or wrapped in a damp paper towel in the microwave — to make them pliable and less likely to crack during folding. Lay the tortilla flat and begin layering in the center, leaving a generous border around the edges:
Start with a generous spoonful of fire-roasted tomato rice spread in a horizontal line across the center of the tortilla. Follow with a portion of the seasoned ground beef, spread evenly over the rice. Finish with a drizzle of chipotle crema over the top of the beef layer. Keep all toppings in the center third of the tortilla — this is the key to a tight, clean fold.
The Folding Technique
Fold the left and right sides of the tortilla inward over the filling, pressing gently to keep them in place. Then, starting from the bottom edge closest to you, roll the tortilla tightly upward and away from you, tucking the filling inward as you roll to keep everything contained. The goal is a firm, compact cylinder with the seam on the underside. If the burrito feels loose, it will not hold together during grilling and risks bursting open. When in doubt, use less filling rather than more.
Mastering the Grilled Cheese Crust
This is the step that transforms a good burrito into a Grilled Cheese Burrito — and it is simpler than it sounds. Heat a skillet over medium heat and sprinkle approximately ¼ cup of shredded cheese (a Mexican blend, cheddar, or Monterey Jack all work well) directly onto the surface of the dry pan. Allow the cheese to melt and begin to sizzle and bubble.
Before the cheese fully sets, place the burrito seam-side down directly on top of the melting cheese. Press down gently with a spatula to ensure full contact between the burrito and the cheese layer. Allow it to cook undisturbed for 3 to 4 minutes until the cheese underneath is golden brown, crispy, and has bonded to the exterior of the tortilla. Carefully flip and repeat on the other side. The finished Grilled Cheese Burrito will have a crackling, golden cheese crust that adds texture and flavor to every single bite.
VI. Expert Success Tips
Avoid Sogginess: Cool the Rice Before Assembly
Steam is the enemy of a crispy Grilled Cheese Burrito. When hot rice is wrapped inside a tortilla, the steam it releases has nowhere to go — and it softens the tortilla from the inside out before the burrito ever hits the skillet. The solution is straightforward: fluff the rice with a fork and allow it to cool for at least 10 minutes before assembling the burritos. This single habit is the difference between a burrito with a crispy, intact tortilla and one that is soft and slightly soggy before you even start grilling.
Prevent Bursting: Do Not Overfill
Every home cook has experienced the frustration of a burrito that splits open during grilling, sending filling spilling across the skillet. The cause is almost always overfilling. Leave a generous border of at least 1.5 inches on all sides of the tortilla when adding your filling, and resist the temptation to add just one more spoonful of beef or rice. A properly filled Grilled Cheese Burrito has room to fold cleanly, roll tightly, and hold together under the pressure of grilling. A slightly less-filled burrito that stays intact is infinitely more satisfying than a generously filled one that falls apart.
Flavor Boost: Chicken Broth for the Rice
As mentioned in the ingredients section, this tip deserves repeating because it makes such a noticeable difference: replace the water called for in your rice recipe with an equal amount of chicken broth. The rice absorbs the broth as it cooks, adding a layer of savory depth that plain water simply cannot provide. It costs almost nothing and takes no additional time, but the flavor payoff is significant enough that you will never cook burrito rice in plain water again.
VII. Pairing & Serving Ideas
Suggested Sides
A Grilled Cheese Burrito is a complete and filling meal on its own, but the right side dish can elevate the entire experience. An avocado corn salad — diced avocado, sweet corn, red onion, cilantro, and lime juice — is a light, bright counterpoint to the rich, smoky burrito. A Mexican street corn casserole brings the beloved elote flavor profile in an easy, shareable format that works beautifully alongside this recipe. And for those who want something indulgent, crispy fries — seasoned with a pinch of the same taco spice blend used in the burrito filling — make for an irresistible companion.
Toppings and Sauces
Serve each Grilled Cheese Burrito warm with a ramekin of extra chipotle crema on the side for dipping. A spoonful of fresh salsa — tomato-based pico de gallo or a roasted tomatillo salsa verde — adds brightness and acidity that balances the richness of the cheese crust. Sliced avocado or a scoop of guacamole on the side rounds out the plate for anyone who wants that extra layer of creamy richness.
VIII. Storage & Reheating Guide
Storage Instructions
Allow assembled Grilled Cheese Burritos to cool completely before storing. Wrap each burrito individually in aluminum foil or plastic wrap, then place in an airtight container. Store in the refrigerator for up to 3 days. For best results, store the chipotle crema separately in a sealed jar and add it fresh when reheating and serving.
Reheating for the Crispy Crust
The biggest challenge of reheating any grilled burrito is restoring the crispy exterior that makes it special — and the microwave, unfortunately, cannot do that. For the best reheating results, use one of these two methods:
Air fryer: Place the Grilled Cheese Burrito in the air fryer basket at 375°F for 4 to 5 minutes, flipping once halfway through. The hot circulating air restores the crispy cheese crust beautifully and heats the filling all the way through.
Skillet: Place the burrito in a dry skillet over medium heat, pressing down gently with a spatula. Heat for 3 to 4 minutes per side until the exterior is crispy and the interior is warmed through. This method most closely replicates the original grilling process and produces excellent results.
IX. Grilled Cheese Burrito Recipe Card
Prep Time: 20 minutes Cook Time: 20 minutes Total Time: 40 minutes Yield: 4 servings Calories: Approximately 553 calories per burrito Protein: Approximately 30g per burrito
Ingredients
Homemade Taco Seasoning:
- 1 teaspoon garlic powder
- 1 teaspoon ground cumin
- 1 teaspoon chili powder
- ½ teaspoon smoked paprika
- ½ teaspoon dried oregano
- ½ teaspoon salt
- ¼ teaspoon black pepper
Fire-Roasted Tomato Rice:
- 1 cup long-grain Jasmine or Basmati rice
- 1 can (14 oz) fire-roasted diced tomatoes
- 1 cup chicken broth (or water)
- 1 teaspoon of the homemade taco seasoning blend
- Salt to taste
Seasoned Ground Beef:
- 1 lb 80% lean ground beef
- Remaining homemade taco seasoning blend
- 2 chipotle peppers in adobo sauce, minced
- ¼ cup red onion, finely diced
- 2 tablespoons fresh cilantro, chopped
- Juice of ½ lime
Zesty Chipotle Crema:
- ½ cup sour cream
- 1–2 chipotle peppers in adobo sauce
- 1 teaspoon honey
- Juice of ½ lime
- 2 tablespoons fresh cilantro
For Assembly:
- 4 large flour tortillas (10-inch)
- 1 cup shredded Mexican blend or cheddar cheese (¼ cup per burrito for the crust)
- Additional toppings as desired: guacamole, salsa, nacho cheese
Instructions
Step 1 — Make the Chipotle Crema: Combine sour cream, chipotle peppers, honey, lime juice, and cilantro in a blender. Blitz until completely smooth. Transfer to a jar and refrigerate until ready to use.
Step 2 — Cook the Fire-Roasted Tomato Rice: Combine rice, fire-roasted tomatoes, chicken broth, and 1 teaspoon of the taco seasoning in a medium saucepan. Bring to a boil, reduce heat to low, cover, and simmer for 18 to 20 minutes until liquid is absorbed and rice is tender. Remove from heat, fluff with a fork, and allow to cool for at least 10 minutes before assembling.
Step 3 — Cook the Seasoned Ground Beef: Brown the ground beef in a large skillet over medium-high heat, breaking it into small crumbles. Drain excess grease thoroughly. Add the remaining taco seasoning blend and minced chipotle peppers. Stir and cook for 2 minutes until the seasoning is fragrant and evenly distributed. Remove from heat and stir in the diced red onion, cilantro, and lime juice.
Step 4 — Warm the Tortillas: Warm each flour tortilla for 20 to 30 seconds in a dry skillet or in the microwave wrapped in a damp paper towel until pliable and soft.
Step 5 — Assemble the Burritos: Layer rice, seasoned beef, and a drizzle of chipotle crema in the center of each tortilla, leaving a 1.5-inch border on all sides. Add any optional toppings. Fold the sides inward, then roll tightly from the bottom to form a compact cylinder.
Step 6 — Grill the Cheese Crust: Heat a skillet over medium heat. Sprinkle ¼ cup of shredded cheese directly onto the dry skillet. Before the cheese fully sets, place the burrito seam-side down on top of the melting cheese. Grill for 3 to 4 minutes until the cheese is golden and crispy. Flip and grill the other side for an additional 2 to 3 minutes.
Step 7 — Serve: Slice the Grilled Cheese Burrito in half diagonally and serve immediately with extra chipotle crema and salsa on the side.
Once you make a homemade Grilled Cheese Burrito with fire-roasted tomato rice, smoky chipotle beef, and a crackling golden cheese crust built right into the tortilla, the drive-thru version will never quite measure up again. This is fast food done the way it was always meant to be — fresh, flavorful, and entirely on your own terms.