
Cheesy Garlic Chicken Wraps: High-Protein Comfort in 22 Min
Table of Contents
These Cheesy Garlic Chicken Wraps deliver 38g of protein per serving in a crispy, golden wrap packed with gooey melted cheese, tangy garlic-yogurt chicken filling, and a bold hit of hot sauce — ready in 22 minutes with rotisserie chicken.
Thank you for reading this post, don't forget to subscribe!I. The Low-Effort, High-Reward Wrap That Changes Weeknight Dinner
There is a category of recipe that home cooks quietly treasure above all others: the ones that look and taste like you put in real effort, deliver genuinely satisfying nutrition, and come together so fast that you can make them on a Tuesday night after work without any planning, any advanced prep, or any real commitment of time or energy.
Cheesy Garlic Chicken Wraps are that recipe.
These wraps are sneakily high in protein — 38 grams per serving — which means they are not just delicious, they are doing serious nutritional work at the same time. For busy gym-going parents, active individuals, and anyone trying to hit their daily protein targets without eating the same four meals on rotation, this is the recipe that makes high-protein eating feel like a reward rather than a sacrifice.
But the nutrition is almost secondary to the eating experience. The real hook is the contrast of the crispy, golden wrap against the gooey, cheesy, creamy filling inside. The moment a perfectly pan-fried Cheesy Garlic Chicken Wrap hits the plate and you hear that crunch when you cut through it — that is the moment you understand why this recipe earns five stars from every single person who makes it. The outside is crackling and golden. The inside is warm, melty, tangy, and deeply savory. Every bite delivers both textures simultaneously in a combination that is genuinely difficult to stop eating.
Twenty-two minutes. Thirty-eight grams of protein. One pan. Let’s make it.
II. Ingredient Breakdown & Smart Swaps
Every ingredient in this Cheesy Garlic Chicken Wraps recipe was chosen for a reason — either for flavor, for nutrition, for speed, or for all three at once. Here is exactly what you need and why.
The Protein Base: Rotisserie Chicken Is the Secret Weapon
Rotisserie chicken is the ingredient that makes this recipe genuinely achievable on a busy weeknight without any compromise in quality. Already cooked, already seasoned, already tender — all it needs is to be shredded and folded into the creamy garlic filling. A standard grocery store rotisserie chicken produces enough shredded meat for two full batches of this recipe, making it one of the most cost-efficient protein sources available.
Leftover roasted or baked chicken works equally well — any cooked chicken breast or thigh meat shredded or finely chopped will integrate seamlessly into the filling. If you are batch cooking on a Sunday, cook a double portion of chicken specifically to use in these Cheesy Garlic Chicken Wraps later in the week.
Creamy Without the Calories: The Greek Yogurt Strategy
The filling in this recipe gets its rich, tangy creaminess from a combination of light Greek yogurt and light mayonnaise — and the choice of these two ingredients over full-fat alternatives is deliberate and smart. Together they create a sauce that is thick, creamy, and satisfying without the caloric load of a full-fat mayonnaise base. The Greek yogurt adds a pleasant tanginess that plain mayo cannot provide, while the mayonnaise adds the richness and body that Greek yogurt alone lacks. The result is a filling that tastes indulgent while keeping the sneaky calorie count honest.
The combination also adds to the protein content of the recipe — Greek yogurt is itself a significant protein source, contributing to that impressive 38g per serving figure alongside the chicken and cheese.
The Flavor Trio: Garlic, Green Onions, and Hot Sauce
These three ingredients are the reason this filling tastes so much better than a standard chicken wrap:
Fresh grated garlic — not garlic powder, not pre-minced jarred garlic — provides a bright, sharp, almost spicy garlic intensity that is the signature flavor note of these Cheesy Garlic Chicken Wraps. Freshly grated garlic on a microplane creates a paste-like consistency that distributes evenly through the filling, ensuring that every bite has garlic flavor rather than occasional concentrated pieces.
Green onions (scallions), sliced thinly, add a mild, fresh allium note and a pop of color that keeps the filling from feeling heavy or monotonous. They provide crunch, freshness, and a visual brightness that makes the finished wrap look as good as it tastes.
Hot sauce — Frank’s RedHot is the recommended choice — adds a vinegary, tangy heat that amplifies every other flavor in the filling without making the wraps genuinely spicy. Frank’s is mild enough that it functions as a flavor enhancer rather than a heat source. It is the ingredient that makes you keep eating and not quite be able to identify why the filling tastes so good.
Wrap Options: Match Your Tortilla to Your Goals
Standard flour tortillas produce excellent Cheesy Garlic Chicken Wraps with a satisfying chew and golden exterior. For those with specific dietary goals:
Low-carb tortillas (such as Mission Carb Balance) reduce the carbohydrate count significantly while maintaining the structural integrity needed for pan-frying. They crisp up beautifully and are virtually indistinguishable from standard flour tortillas in the finished wrap.
High-protein tortillas push the already impressive protein count of this recipe even higher — some varieties add 8 to 10 grams of protein per tortilla, which combined with the 38g from the filling produces a wrap with a genuinely elite macronutrient profile for a 22-minute weeknight meal.
III. Customization: Make It Completely Your Own
One of the most liberating qualities of this Cheesy Garlic Chicken Wraps recipe is how naturally it adapts to whatever you want it to be. The base filling is a perfectly balanced blank canvas — go wild with it.
Themed Add-Ins for Adult Palates
The creamy garlic filling pairs beautifully with a range of bold additions that elevate the basic wrap into something with a more specific character:
Sliced avocado folded into the filling adds creaminess and healthy fats that make each bite more substantial and satisfying. Sun-dried tomatoes introduce a concentrated, sweet-tart intensity that cuts through the richness of the cheese and yogurt sauce. Kalamata olives, roughly chopped, add a salty, briny depth that gives the wrap a Mediterranean personality. Baby spinach wilts slightly from the heat of the filling and adds a leafy freshness and nutritional boost without altering the flavor profile of the Cheesy Garlic Chicken Wraps in any disruptive way.
Kid-Approved Adjustments for Picky Eaters
This recipe is remarkably picky-eater friendly in its base form — the melted cheese, the mild creaminess of the filling, and the satisfying crunch of the golden wrap are qualities that children tend to love instinctively. For households where garlic and hot sauce are dealbreakers for younger diners, simply reduce the fresh garlic to one clove or less and omit the hot sauce entirely. The filling remains creamy, cheesy, and delicious — just more gently flavored. You can always add extra garlic and hot sauce to the adult portions at the mixing stage before assembling the children’s wraps separately.
IV. Three Master Cooking Methods
Method 1 — The Classic Pan-Fry: The Crispiest Result
This is the primary method and the one that produces the most impressive results for this Cheesy Garlic Chicken Wraps recipe. Heat a non-stick or cast iron skillet over medium heat with a light film of oil or butter. Place the assembled wrap seam-side down in the hot pan — the weight of the wrap and the heat from the pan will seal the seam as it cooks. Cook for 3 to 4 minutes per side until the tortilla is deeply golden and crackling crisp.
Here is the game-changing technique: place a lid on the pan for the first 2 minutes of cooking. The lid traps steam inside the pan, which heats the filling and melts the cheese from the inside out while the exterior is crisping. Without the lid, the outside becomes golden before the cheese inside has fully melted. With the lid, both happen simultaneously — a perfectly melty, gooey interior and a crackling, golden exterior achieved at exactly the same moment. Remove the lid for the final minute to ensure any excess moisture evaporates and the wrap finishes with maximum crispiness.
Method 2 — The Air Fryer: Hands-Off and Healthier
For a lower-oil alternative that requires almost no attention, the air fryer produces excellent Cheesy Garlic Chicken Wraps with a uniformly crispy exterior and thoroughly heated filling. Place assembled wraps in the air fryer basket with the seam side down, leaving space between each wrap. Cook at 375°F / 190°C for 6 to 8 minutes, flipping once halfway through. No oil required beyond a light spray of cooking spray on the exterior of the wrap for maximum color. The air fryer method is ideal for making 1 to 2 wraps without heating a full pan, or for reheating leftover wraps to restore their crispiness.
Method 3 — The Oven Bake: Best for Feeding a Family
When you need to cook multiple Cheesy Garlic Chicken Wraps simultaneously for a family meal, the oven is the most practical method. Place assembled wraps seam-side down on a parchment-lined baking sheet, spray lightly with cooking spray, and bake at 400°F / 200°C for 10 to 12 minutes, flipping once halfway through the cooking time. The oven method produces wraps that are consistently cooked with a lightly golden exterior — not quite as dramatically crispy as the pan-fried version, but perfectly satisfying and dramatically more convenient when you are making six or eight wraps at once.
V. Expert Tips for Perfect Cheesy Garlic Chicken Wraps
The Melty Middle Magic: Double-Layer Your Cheese
The single most impactful technique for achieving the gooey, fully melted cheese interior that defines great Cheesy Garlic Chicken Wraps is to layer the cheese in two places rather than one. Place a layer of shredded cheese directly on the tortilla first, before adding the chicken filling. Then add the filling on top of the cheese, and finish with another layer of cheese on top of the filling before folding. This double-cheese approach ensures that the cheese melts from both above and below the filling simultaneously, creating a coating of melted cheese that binds the entire filling together into a cohesive, gooey, irresistible whole.
A single layer of cheese on top of the filling melts adequately but does not fully integrate with the chicken mixture in the same way. Double-layering is the difference between cheese on a wrap and a truly cheesy wrap.
Tightly Rolled: The Technique That Prevents Leaks
A Cheesy Garlic Chicken Wraps that opens up during cooking is both frustrating and wasteful. Prevent this with proper rolling technique:
Place the filling in the lower third of the tortilla, leaving a clear border on the left, right, and bottom edges. Fold the left and right sides inward over the filling first — this creates the sealed ends that prevent filling from escaping sideways. Then fold the bottom edge up over the filling and roll tightly upward, applying consistent, gentle pressure as you roll. The finished wrap should be compact and firm, with no loose edges. Place it seam-side down immediately so gravity helps maintain the seal until it hits the hot pan.
VI. Meal Prep & Zero-Waste Leftovers
Make-Ahead Strategy: Prep the Filling in Advance
The chicken filling for these Cheesy Garlic Chicken Wraps is one of the most practical make-ahead components in this recipe collection. Prepare the complete filling — shredded rotisserie chicken, Greek yogurt, mayonnaise, fresh garlic, green onions, hot sauce, and seasonings — and store it in an airtight container in the refrigerator for up to 2 to 3 days. When you need a wrap, the filling is ready in seconds and the total time from refrigerator to plate drops to under 10 minutes.
This approach is particularly valuable for meal prepping a week of high-protein lunches — make the filling on Sunday, assemble and cook fresh wraps each morning or evening as needed.
Repurposing the Filling: Zero Waste, Maximum Variety
The creamy garlic chicken filling is extraordinarily versatile beyond wraps, which means that any leftover filling never goes to waste:
Use it as the filling for a grilled cheese sandwich (toastie) — spread generously between two slices of sourdough or white bread, add extra cheese, and grill until golden for a completely different but equally satisfying meal. Spoon it into quesadillas for a quick Mexican-inspired variation that is ready in 5 minutes. Or stuff it into baked potatoes for a hearty, protein-packed loaded potato that could not be simpler to prepare. The same filling, three entirely different meals — all excellent.
Storage and Reheating for Maximum Crunch
Store cooked Cheesy Garlic Chicken Wraps in an airtight container in the refrigerator for up to 2 days. For reheating, always use a dry skillet over medium heat rather than the microwave. The microwave reheats the filling adequately but destroys the crispy exterior, producing a soft, slightly steamed wrap that is a pale shadow of the original. Two to three minutes in a hot skillet restores the golden, crackling crust and heats the filling through simultaneously. The air fryer at 350°F for 3 to 4 minutes is an equally effective reheating method that produces excellent results with even less attention.
VII. Serving Suggestions: Building the Complete Meal
The Full Meal Approach
Cheesy Garlic Chicken Wraps are a complete protein-packed meal on their own, but the right accompaniments make them even better. A big crunchy salad — romaine or cos lettuce with cucumber, cherry tomatoes, and a sharp vinaigrette — provides the fresh, acidic contrast that cuts through the richness of the cheesy filling and balances the plate nutritionally. Roasted vegetables — broccoli, zucchini, cherry tomatoes, or bell peppers tossed in olive oil and roasted at 425°F until caramelized — complement the garlic and hot sauce notes in the filling and add fiber and micronutrients to what is already a nutritionally impressive meal.
The Dipping Station: An Elevated Experience
For a more social, indulgent presentation of these Cheesy Garlic Chicken Wraps — perfect for a casual dinner party, game night, or weekend lunch — set up a small dipping station alongside the wraps. Fresh tomato salsa adds brightness and acidity. Dill pickles or pickle slices provide a briny, tangy crunch that is unexpectedly excellent against the creamy garlic filling. Tortilla chips on the side lean into the snack-food energy of the wrap and make the whole presentation feel festive and fun. Even a simple bowl of extra Greek yogurt seasoned with lemon juice and herbs functions as a cool, refreshing dip that ties back to the flavors already in the wrap.
VIII. Recipe Card & Full Macro Breakdown
Prep Time: 15 minutes Cook Time: 7 minutes Total Time: 22 minutes Yield: 4 wraps (4 servings)
Ingredients
The Filling:
- 2 cups shredded rotisserie chicken
  (or leftover cooked chicken)
- ¼ cup light Greek yogurt
- 2 tbsp light mayonnaise
- 2–3 cloves fresh garlic, finely grated
- 3 green onions (scallions), thinly sliced
- 1–2 tbsp Frank's RedHot (or hot sauce
  of choice, adjust to taste)
- Salt and black pepper to taste

The Wrap:
- 4 large flour tortillas (10-inch)
  (or low-carb/high-protein tortillas)
- 1½ cups shredded cheese
  (cheddar, mozzarella, or Mexican blend)
- Light cooking spray or small amount
  of oil/butter for pan-frying

Optional Add-ins:
- Sliced avocado
- Sun-dried tomatoes
- Kalamata olives, roughly chopped
- Baby spinach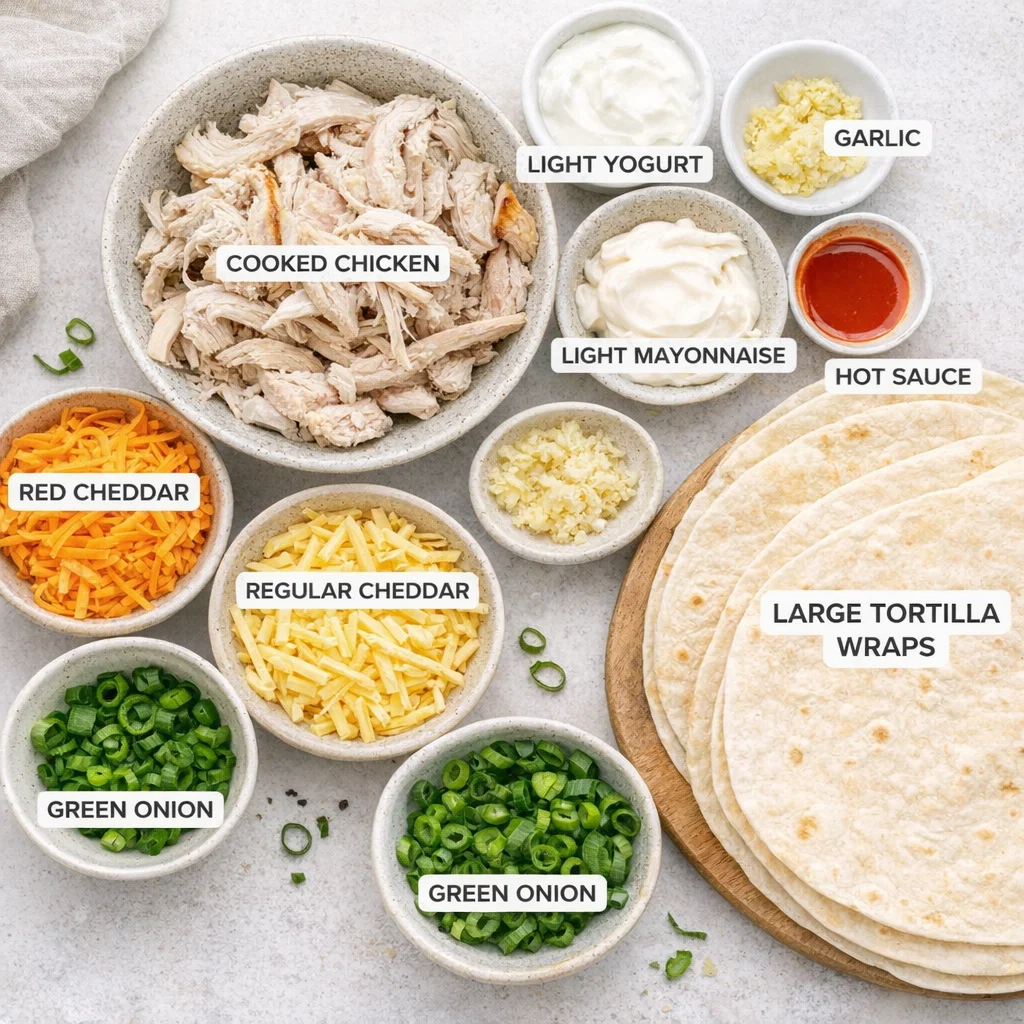

Instructions
Step 1 — Make the Filling: In a large bowl, combine shredded chicken, light Greek yogurt, light mayonnaise, freshly grated garlic, sliced green onions, and hot sauce. Season with salt and black pepper. Mix until all ingredients are evenly combined and the filling is creamy and well-coated. Taste and adjust garlic, hot sauce, and seasoning to preference.
Step 2 — Assemble the Wraps: Lay a tortilla flat on a clean surface. Sprinkle a layer of shredded cheese in the lower third of the tortilla. Add a generous quarter of the chicken filling on top of the cheese. Sprinkle another layer of cheese over the filling (double-cheese method). Fold the left and right sides inward, fold the bottom edge up, and roll tightly upward. Place seam-side down. Repeat with remaining tortillas.
Step 3 — Pan-Fry (Primary Method): Heat a non-stick skillet over medium heat with a light film of oil or butter. Place wrap seam-side down. Cover with a lid and cook for 2 minutes. Remove lid and cook for an additional 1 to 2 minutes until golden and crispy. Flip and cook uncovered for 3 to 4 minutes until the second side is equally golden.
Alternative — Air Fryer: 375°F / 190°C for 6 to 8 minutes, flipping once. Alternative — Oven: 400°F / 200°C for 10 to 12 minutes, flipping once.
Step 4 — Serve: Slice each Cheesy Garlic Chicken Wrap diagonally. Serve immediately with salad, roasted vegetables, salsa, pickles, or chips on the side. Share your results using #cookedandloved.
📊 Macro Breakdown (Per Serving — 1 Wrap)
| Nutrient | Amount |
|---|---|
| Calories | 476 kcal |
| Protein | 38g |
| Total Carbohydrates | 19g |
| Total Fat | 24g |
| Fiber | 1g |
⭐ Rate This Recipe
If these Cheesy Garlic Chicken Wraps earned a permanent spot in your weeknight dinner lineup — or if you made one of the variations and discovered something you loved — please leave a star rating and share your results in the comments below. Your feedback helps other home cooks find this recipe with confidence, and your photos inspire the community to try new variations.
Share your creations on social media using #cookedandloved — we genuinely love seeing your versions, your add-ins, your family’s reactions, and your plates.
Twenty-two minutes. Thirty-eight grams of protein. One crackling, golden, gooey, deeply satisfying wrap. These Cheesy Garlic Chicken Wraps are the recipe that proves high-protein weeknight cooking does not require any compromise on flavor, texture, or the simple pleasure of a meal that makes everyone at the table genuinely happy.