
Chicken Bake: How to Make Juicy Baked Chicken Breasts
Table of Contents
Your ultimate guide to a perfect chicken bake — tender, flavorful, and never dry again.
Thank you for reading this post, don't forget to subscribe!I. The End of Dry Chicken Bake: A Back-to-Basics Solution
If you have ever pulled a chicken bake out of the oven only to find a dry, rubbery, flavorless result, you are not alone. Baked chicken breasts are one of the most searched recipes online — and one of the most commonly botched. The good news? Perfectly juicy baked chicken breasts are not a matter of luck or culinary talent. They are the result of a repeatable, proven process.
This chicken bake guide introduces the B.B.R.R.R. Method — a five-step back-to-basics approach developed and tested to make your oven-baked chicken breast a reliable, crowd-pleasing dish every single time. Thousands of home cooks have already transformed their weeknight dinners with this method, and now it is your turn.
Whether you are new to cooking or simply tired of gambling every time you make a chicken bake recipe, this guide will give you confidence in the kitchen. Say goodbye to dry chicken forever.
II. Essential Ingredients for the Perfect Chicken Bake
Great baked chicken breasts start with great ingredients. You do not need an elaborate shopping list — just a few quality staples chosen with intention.
The Protein: Choosing Your Chicken
For the best chicken bake, always start with fresh chicken breasts when possible. Fresh chicken retains more natural moisture and delivers a better texture than frozen. That said, frozen chicken breasts work well too — the key is ensuring they are completely thawed before cooking. A partially frozen chicken breast will cook unevenly, leading to dry edges and undercooked centers, which is a food safety concern as well as a culinary one.
The Fat: Butter vs. Olive Oil
When it comes to your chicken bake, fat is your friend. You have two excellent options:
- Melted butter: Adds a rich, indulgent flavor and encourages a beautifully golden-brown crust.
- Olive oil: A lighter, heart-healthy classic choice that still delivers excellent results for a baked chicken breast.
The Seasoning: All-Purpose Rub
A simple four-ingredient seasoning blend is all you need to make your chicken bake recipe shine:
- Kosher salt
- Smoked paprika
- Garlic powder
- Black pepper
Note on Pre-Brined Store-Bought Chicken
Check the label before you bake chicken breasts you bought at the grocery store. Many store-bought packages include a note such as “enhanced with up to 15% chicken broth solution” or similar phrasing. This means the chicken has already been injected with a sodium solution. If that is the case, you can skip Step 1 (Brine) of the B.B.R.R.R. method to avoid over-salting your chicken bake.
III. Recommended Equipment for a Successful Chicken Bake
The Foolproof Tool: A Cooking Thermometer
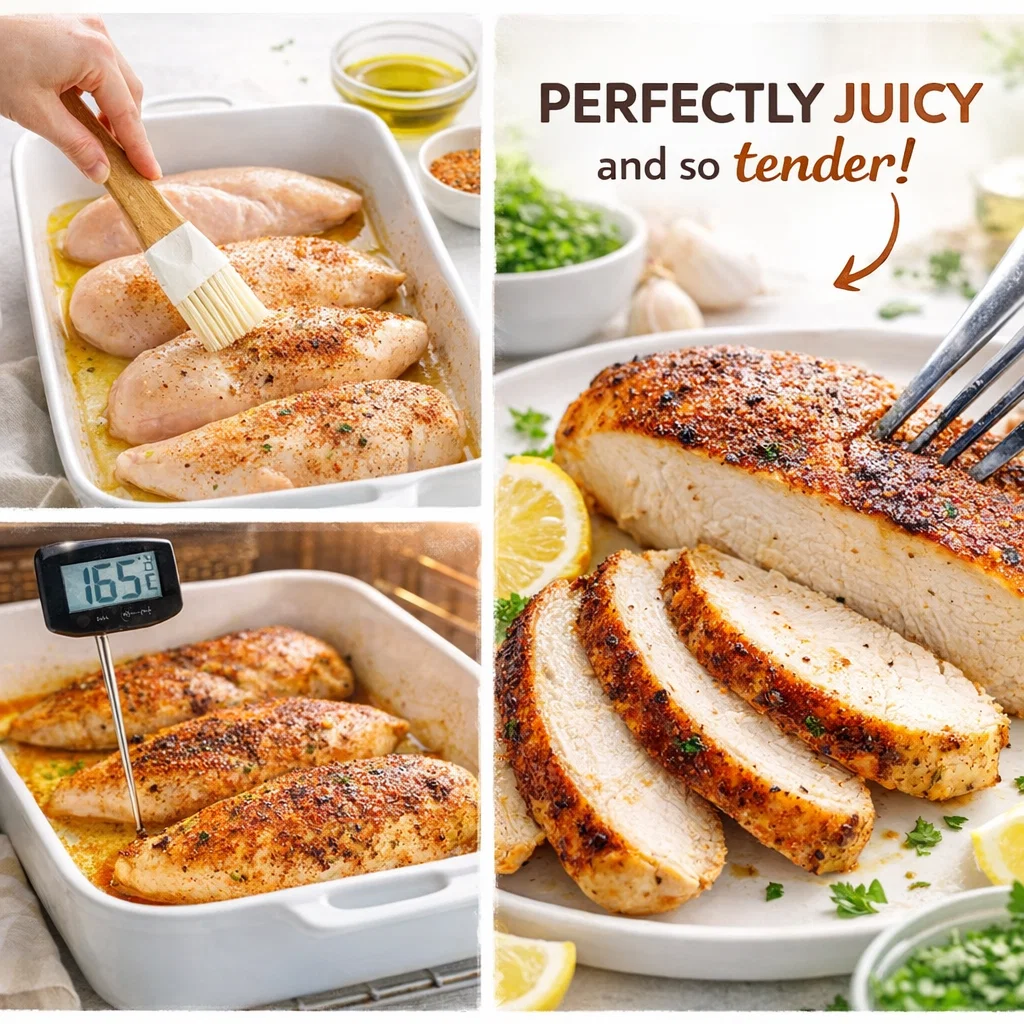
The single most important tool for any chicken bake recipe is a cooking thermometer. There is simply no reliable substitute. Visual cues like color or juice clarity are not accurate enough. The USDA recommends an internal temperature of 165°F (74°C) for safe consumption of baked chicken breasts. An instant-read thermometer or a dual-probe oven thermometer gives you real-time data, so you pull your chicken bake at the exact right moment — fully cooked but never overdone.
Safe Bakeware: What to Use (and What to Avoid)
⚠️ Important Warning: Do not use glass baking dishes (such as Pyrex) for a high-heat chicken bake at 450°F. Sudden temperature changes can cause glass to shatter in the oven, creating a dangerous and messy situation.
For best results with baked chicken breasts, use:
- Metal baking sheets (rimmed sheet pans work best)
- Heat-safe roasting pans or cast iron skillets
IV. The B.B.R.R.R. Masterclass: Step-by-Step Chicken Bake Method
This five-step method is the backbone of every great chicken bake. Follow each step carefully and you will never serve dry chicken again.
Step 1: BRINE — The Juiciness Secret
Fill a bowl with lukewarm water and stir in a generous amount of Kosher salt (about 1 tablespoon per cup of water). Submerge your chicken breasts and let them soak for 15 minutes. This quick brine works by osmosis — the saltwater solution is absorbed into the muscle fibers, seasoning the chicken from the inside out and dramatically improving moisture retention during the chicken bake process. The result? Baked chicken breasts that stay juicy even if slightly overcooked.
Pro Tip: Remember to skip this step if your store-bought chicken is already in a sodium solution.
Step 2: BRUSH — Build the Crust
After patting your chicken dry with paper towels, brush both sides generously with melted butter or olive oil. This fat layer serves two important purposes for your chicken bake: it prevents sticking to the pan, and it creates the Maillard reaction during roasting — that gorgeous, golden-brown crust that makes baked chicken breasts look and taste restaurant-worthy.
Step 3: RUB — Layer the Flavor
Apply your all-purpose seasoning blend — Kosher salt, smoked paprika, garlic powder, and black pepper — generously on both sides of each chicken breast. Do not be shy. Under-seasoning is one of the most common reasons a chicken bake comes out bland. Press the spices firmly into the meat to ensure they adhere before going into the oven.
Step 4: ROAST — High Heat is Your Friend
Preheat your oven to 450°F (232°C). This is higher than most chicken bake recipes recommend, and that is exactly the point. High-heat roasting quickly seals the exterior of the chicken breast, locking in the juices rather than slowly evaporating them. Roast for 15 to 18 minutes, depending on thickness. Use your thermometer to confirm the internal temperature reaches 165°F at the thickest part.
Why not low and slow? Traditional low-temperature chicken bake methods (325°F to 375°F) take longer, giving moisture more time to escape through the meat’s surface. The high-heat method minimizes that window and delivers superior results.
Step 5: REST — The Non-Negotiable Finale
Remove your chicken bake from the oven and immediately tent it loosely with aluminum foil. Allow the baked chicken breasts to rest for 5 to 10 minutes before cutting. This step is non-negotiable. During roasting, the muscle fibers contract and push juices toward the center of the meat. Resting allows those fibers to relax and the juices to redistribute evenly throughout the breast. Cut too soon and all that precious moisture runs out onto your cutting board — not into your mouth.
B.B.R.R.R. Quick Reference
- Brine: 15 min saltwater soak
- Brush: Coat with butter or olive oil
- Rub: Season generously on both sides
- Roast: 450°F for 15–18 min to 165°F internal temp
- Rest: 5–10 min under foil before slicing
V. Customization and Serving Ideas for Your Chicken Bake
Flavor Profiles: Beyond the Basic Rub
Once you have mastered the base chicken bake recipe, the seasoning world is your oyster. Swap out the standard rub for any of these crowd-pleasing flavor profiles:
- Italian Chicken Bake: Italian seasoning, dried basil, oregano, crushed red pepper, and garlic powder
- Cajun Chicken Bake: Cajun seasoning blend with cayenne, thyme, and onion powder for a spicy kick
- Taco-Spiced Chicken Bake: Cumin, chili powder, garlic, and lime zest for a Tex-Mex twist
- Everything Bagel Chicken Bake: Everything bagel seasoning blend — sesame, poppy, onion, garlic, salt — for a savory, crunchy crust
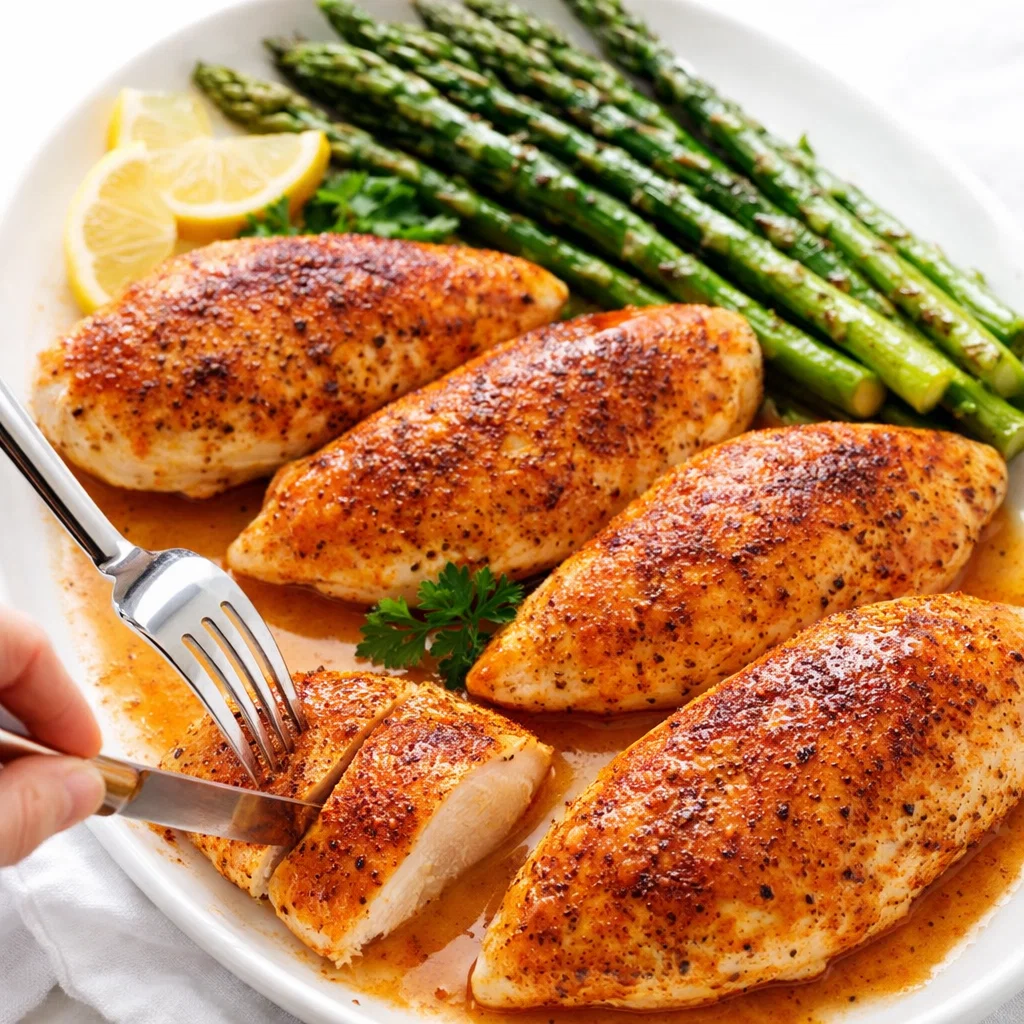
Versatile Uses for Baked Chicken Breasts
The beauty of a well-executed chicken bake is its versatility. Use your perfectly baked chicken breasts in any of the following ways:
- Sliced over a green salad or Caesar salad
- Diced and added to grain bowls (quinoa, farro, brown rice)
- Shredded into chicken soup, chicken noodle soup, or white bean chili
- Tossed into pasta dishes (creamy Alfredo, pesto, or marinara)
- Chopped for tacos, burritos, or nachos
Side Dish Pairings
Round out your chicken bake dinner with these easy, complementary sides:
- Roasted asparagus, broccoli, or Brussels sprouts (you can roast them on the same pan at 450°F)
- Creamy mashed potatoes or garlic mashed cauliflower
- Steamed or roasted sweet potatoes
- Simple green salad or coleslaw
VI. Storage and Meal Prep Tips
One of the best things about a well-made chicken bake is how well it stores. Batch-cooking your baked chicken breasts is one of the smartest meal prep strategies for busy weekdays.
Refrigeration
Allow your baked chicken breasts to cool completely before storing. Transfer to an airtight container and refrigerate for up to 3 days. For best moisture retention, store the chicken bake pieces whole and slice them only when ready to use.
Freezing
Baked chicken breasts freeze beautifully. For maximum meal-prep efficiency:
- Slice or shred before freezing — this makes it far easier to portion out later for salads, soups, or wraps
- Freeze in meal-sized portions in zip-lock freezer bags or airtight containers
- Chicken bake leftovers stay good in the freezer for up to 3 months
- Thaw overnight in the refrigerator; reheat gently with a splash of chicken broth to restore moisture
VII. Keep Going: More Back-to-Basics Protein Tutorials
If this chicken bake method has simplified your cooking life, you are going to love what is next. The back-to-basics approach works just as well for other proteins:
- Baked Pork Chops: Same B.B.R.R.R. principles, adapted for thicker cuts
- Baked Salmon: High-heat roasting for crispy skin and perfectly flaky fish
- Baked Tofu: For plant-based cooks looking for the same reliable results
Made this chicken bake recipe? We would love to hear how it turned out! Share your results, tag your photos, and join the growing community of home cooks who have taken back control of their kitchens with the back-to-basics method. Drop a comment below with your favorite flavor variation or side dish pairing — your creativity might inspire the next recipe.
Happy cooking — and never settle for dry chicken again!
Looking for more dinner inspiration?
- Grilled Cheese Burrito
- Amish Hamburger Steak Bake: The Ultimate Comfort Food Dinner
- Philly Cheesesteak Egg Rolls
- Cheesy Garlic Chicken Wraps: High-Protein Comfort in 22 Min
- Chicken Caesar Sandwich
- Sour Cream Beef Noodle Casserole
- Taco Bowl Recipe
- Honey Garlic Shrimp: The Best Healthy Dinner in 20 Minutes
- Authentic Carbonara Recipe
- Mac and Cheese Meatloaf Casserole