
Ultimate Quick and Easy Chicken Enchiladas
Table of Contents
Dinner routines have a way of becoming exactly that — routine. The same five or six meals cycling through the week with the kind of predictable regularity that makes everyone at the table slightly less enthusiastic than they were the first time around. This easy chicken enchiladas recipe is the disruption that rotation needs — a genuinely exciting, deeply satisfying dinner that comes together in 30 minutes total with just 15 minutes of active prep and only 4 main ingredients.
Thank you for reading this post, don't forget to subscribe!This is weeknight cooking at its most practical and its most delicious simultaneously. Kid-friendly enough that even the pickiest eaters at the table will clean their plate, crowd-pleasing enough to serve at a casual dinner party without apology, and simple enough that it doesn’t require any special cooking skills, equipment, or an hour of your evening to execute. Whether you’re pulling shredded rotisserie chicken from a store-bought bird, using leftover grilled chicken from earlier in the week, or slow-cooking chicken breast specifically for this purpose, the result is the same — bubbling, cheesy, saucy enchiladas that smell extraordinary coming out of the oven and taste even better than they smell.
This is the recipe that earns a permanent spot in your dinner rotation from the very first time you make it.
Ingredient Essentials and Expert Selections
The Protein Base
2 cups of shredded chicken is the protein foundation of these easy chicken enchiladas, and the source of that shredded chicken gives you multiple convenient options. Store-bought rotisserie chicken is the fastest and most convenient — a whole bird typically yields well over 2 cups of shredded meat and requires only pulling the meat from the bones and shredding with two forks. Leftover grilled chicken adds a slightly smoky character to the filling that works beautifully with the enchilada sauce. Slow-cooked chicken breast produces the most tender, easily shredded result and can be prepared in the morning to make dinner assembly even faster.
For households that prefer a beef-based option, 1 pound of ground beef (approximately 2 cups cooked and drained) substitutes directly for the shredded chicken with no other recipe adjustments required. Brown and drain the ground beef before mixing with the other filling components and proceed exactly as the chicken version directs.
The “Best Melt” Cheese
2 cups of cheese is the quantity that produces the generous, bubbly, pull-apart melt that makes homemade chicken enchiladas so visually and texturally satisfying. Cheddar delivers sharp, tangy flavor and a deep golden color when baked. Monterey Jack melts more smoothly and produces a creamier, milder result. Colby Jack splits the difference — the combination of both cheeses in a single blend that melts beautifully and delivers a balanced flavor profile that works for every age at the table.
The most important cheese tip in this entire recipe: grate your own cheese from a block rather than using pre-shredded bags. Pre-shredded cheese contains anti-caking agents — typically potato starch or cellulose — that coat each strand and prevent clean, smooth melting. Freshly grated cheese from a block melts completely, evenly, and produces the glossy, bubbly, slightly browned topping that defines a great baked chicken enchilada recipe. The extra 2 minutes of grating time produces a visibly and texturally superior result.
Tortilla Choice
The tortilla selection for these easy chicken enchiladas comes down to a straightforward tradeoff between authenticity and ease of handling.
Corn tortillas are the traditional choice and produce the most authentically Mexican-style enchilada — with a slightly earthy, corn-forward flavor that complements the enchilada sauce beautifully and holds up well to the sauce without becoming gummy. Their disadvantage is a tendency to crack when rolled cold, which the warming technique in the preparation section addresses completely.
Flour tortillas are the beginner-friendly choice — more pliable at room temperature, less prone to cracking during rolling, and producing a slightly softer, more substantial enchilada that many American home cooks prefer. The flavor is milder than corn but works well with the bold enchilada sauce and cheese filling.
Flavor Add-ons: The Onion Decision
Finely chopped sweet, white, or yellow onion stirred into the filling adds savory depth and a slight sweetness that rounds out the overall flavor profile of these easy enchiladas. The critical texture tip here is in how finely you chop them — very finely diced onion pieces will cook through completely during the 20 to 25 minute bake time and become tender and almost imperceptible in texture. Larger pieces may retain crunch, which can be unpleasant in the finished enchilada. If you prefer to guarantee completely soft onion without any texture risk, sauté the chopped onion in a small amount of butter or oil for 3 to 4 minutes until softened before mixing into the filling.
Strategic Preparation and Pro-Tips
The Anti-Soggy Rule
The single most important technique tip for these baked chicken enchiladas — the one that separates perfectly textured enchiladas from mushy, disappointing ones — is this: do not cover the baking dish with aluminum foil during baking. This instruction runs counter to the instinct many home cooks have to cover baked dishes to retain moisture, but in the context of enchiladas it produces exactly the wrong result. Covering the dish traps steam from the sauce and filling, which accumulates and soaks back into the tortillas, producing a soft, wet, structurally compromised enchilada that bears little resemblance to the restaurant version. Baking uncovered allows the top layer of cheese to bubble and brown, the sauce on top to concentrate slightly, and the tortillas to maintain enough structural integrity to hold their rolled shape when served.
The Double Sauce Rule
The base recipe calls for 2¼ cups of enchilada sauce, which is calibrated to produce a properly sauced result. The community around this easy chicken enchilada recipe has spoken consistently and enthusiastically on one modification: double the sauce. Readers who double the enchilada sauce report a richer, more saturated, more deeply flavored result — one where the sauce permeates every layer of the enchilada rather than just coating the exterior. If you like your enchiladas as saucy and intensely flavored as possible, this is the single modification most likely to produce that result.
Tortilla Handling: The Warming Technique
For corn tortilla enchiladas, the warming step is not optional — it’s the technique that makes rolling possible without cracking. Heat a dry skillet over medium heat and warm each corn tortilla for 10 seconds per side until it has become noticeably more pliable and flexible. Work quickly after warming — tortillas begin to stiffen again as they cool. Keep warmed tortillas stacked and covered with a clean kitchen towel while you work to preserve their flexibility through the rolling process.
Bulking It Up
For larger appetites or for stretching the recipe to serve more people, the filling accepts additions gracefully without requiring any other adjustments. A 4-ounce can of diced green chiles stirred into the filling adds mild heat, slight tanginess, and additional moisture that makes the filling more complex and interesting. Half a can of drained and rinsed black or pinto beans adds plant-based protein, fiber, and a heartiness that makes each enchilada more filling and nutritionally complete.
The Execution: Step-by-Step
Step 1: Preparation
Preheat your oven to 375°F (190°C) and position the rack in the center of the oven. If you’re using corn tortillas, begin warming them now in a dry skillet as described above. Have all filling components measured and ready before assembly begins — the rolling process moves quickly and having everything at hand prevents gaps in the workflow.
Step 2: Mixing the Filling
In a large mixing bowl, combine the shredded chicken, finely chopped onion, 1 cup of the grated cheese, and ¾ cup of the enchilada sauce. Stir until everything is evenly combined and the chicken is uniformly coated with the sauce. The ¾ cup of sauce used in the filling serves two purposes: it flavors and moistens the chicken mixture, and it helps the filling hold together during rolling so pieces don’t fall out as you work.
Step 3: Pan Setup
Spread a thin, even layer of enchilada sauce across the bottom of a 9×13 inch baking dish before placing any rolled enchiladas inside. This sauce layer serves as a non-stick barrier that prevents the tortilla bottoms from adhering to the pan during baking, making serving and cleanup significantly easier. It also ensures that the bottom of each enchilada is flavored and moistened throughout the bake rather than sitting dry against a bare pan.
Step 4: Rolling
Place ¼ to ⅓ cup of filling along the center of each tortilla — enough to fill it generously without overfilling to the point where the tortilla can’t close cleanly. Roll the tortilla tightly around the filling and place it seam-side down in the prepared baking dish. The seam-side-down placement holds the roll closed during baking without requiring toothpicks or any other fastening. Continue filling and rolling until all tortillas and filling are used, placing each roll snugly against the previous one in the dish.
Step 5: Topping
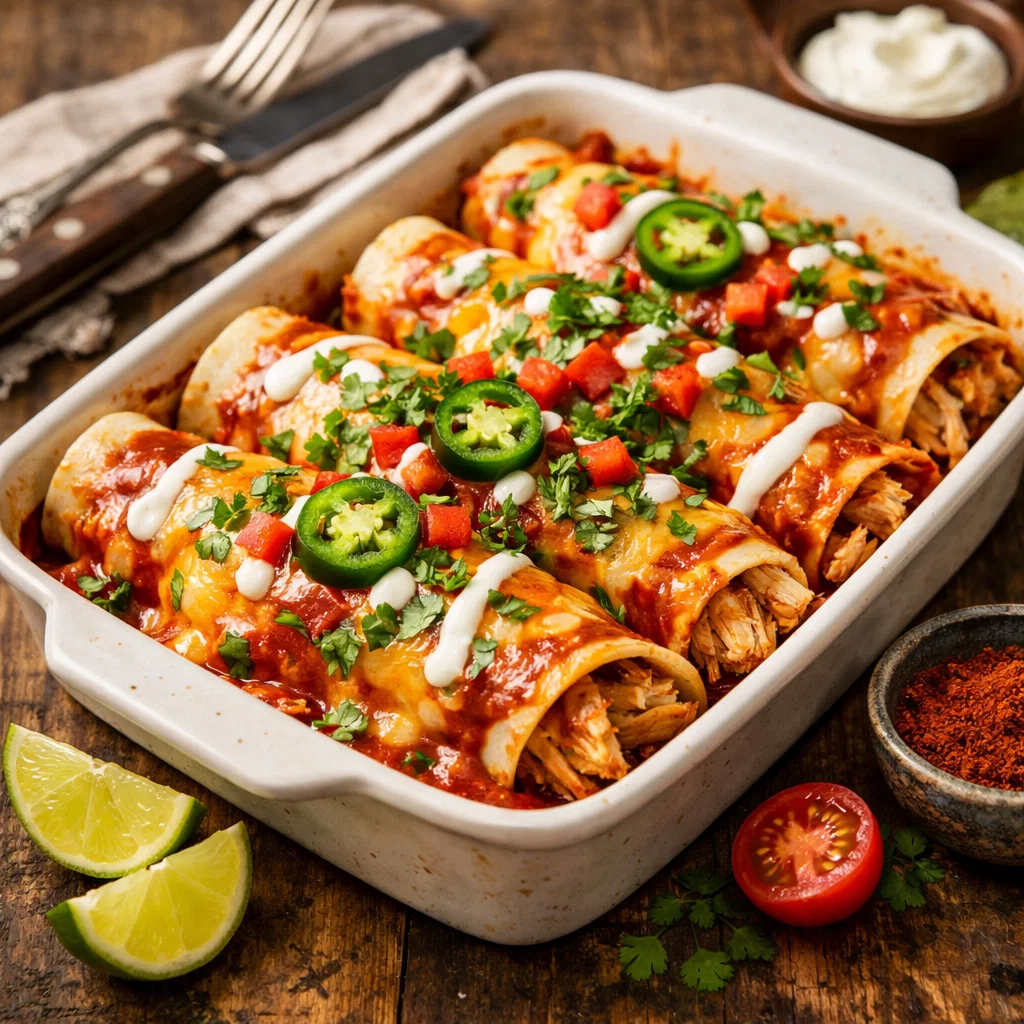
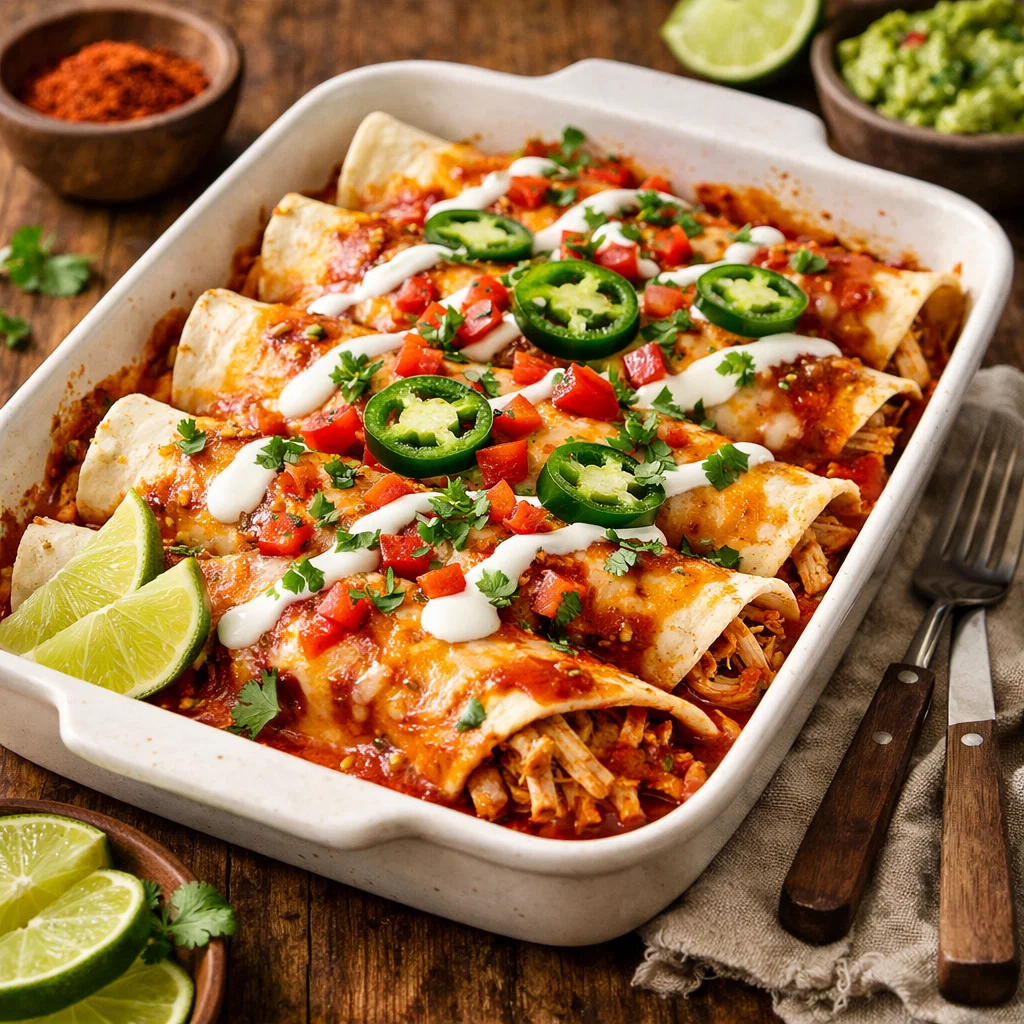
Drizzle the remaining enchilada sauce evenly over the tops of all the rolled enchiladas — use the back of a spoon to ensure complete coverage from edge to edge of the dish. Sprinkle the remaining 1 cup of grated cheese generously and evenly over the sauced tops.
Step 6: Baking
Place the uncovered baking dish in the preheated oven and bake for 20 to 25 minutes until the cheese topping is completely melted, bubbling actively, and beginning to develop golden-brown spots at the edges and peaks. The centers of the enchiladas should be thoroughly warmed through — if you’re uncertain, insert an instant-read thermometer into the center of one enchilada; it should read at least 165°F. Allow the finished baked chicken enchiladas to rest for 3 to 5 minutes before serving — this brief rest allows the filling to settle and makes serving cleaner and easier.
Serving and Side Pairings
Next-Level Garnishes
These easy chicken enchiladas go from great to extraordinary with the right garnishes applied immediately before serving. A generous dollop of cold sour cream against the hot, cheesy enchilada creates a temperature contrast and tangy creaminess that ties the whole dish together. Fresh cilantro scattered over the top adds bright, herby freshness that cuts through the richness of the cheese and sauce. Guacamole — whether homemade or store-bought — adds creamy avocado richness and a cooling effect that complements the warm, saucy enchiladas beautifully.
Recommended Sides
Mexican Street Corn Salad brings sweet, charred corn kernels dressed with lime, cotija, and chili powder that complement the enchiladas’ flavor profile without duplicating it. Texas Caviar — a bright, bean-and-vegetable salsa with a tangy vinaigrette — provides acidity and crunch that balance the richness of the baked cheese chicken enchiladas. Refried beans are the most classic accompaniment — creamy, savory, and the most traditional pairing for enchiladas on any Mexican or Tex-Mex table.
Dessert Pairings
Complete the Mexican-inspired meal with Tres Leches Cake — soaked in three milks and extraordinarily moist — for a dessert that feels authentically connected to the meal’s flavor profile. Churro Cookies are a fun, cinnamon-sugar alternative that bridges the gap between the familiar and the festive and provides a perfect sweet finish to a satisfying dinner.
Storage and Leftovers
Allow the finished easy chicken enchiladas to cool to room temperature before transferring to an airtight container. Refrigerate for up to 4 days — the enchiladas hold up remarkably well in the refrigerator, maintaining their flavor and structure through multiple days of leftovers.
To reheat, place individual enchiladas in a microwave-safe dish and heat on medium power for 1 to 2 minutes until warmed through, or place in a 350°F oven for 10 to 15 minutes until heated completely. If the enchiladas appear dry after refrigeration — which can happen as the tortillas continue absorbing sauce during storage — add a small spoonful of additional enchilada sauce over the top before reheating to restore moisture and freshness.