Teriyaki Chicken: Better Than Take-Out in Just 15 Minutes
Table of Contents
This easy 15-minute Teriyaki Chicken features a glossy, restaurant-quality homemade teriyaki sauce, perfectly seared chicken, and zero marinating time — faster than delivery and healthier than anything in a take-out box.
Thank you for reading this post, don't forget to subscribe!I. The One-Pan Weeknight Recipe That Beats Every Take-Out Order
There are nights when you want teriyaki chicken from your favorite Japanese restaurant — the glossy, caramelized sauce, the tender chicken, the way it coats every grain of rice beneath it. And then there is the reality of that night: the wait time, the delivery fee, the packaging, and the fact that by the time it arrives, you have already eaten a handful of crackers standing over the kitchen counter.
This Teriyaki Chicken recipe exists for exactly those nights. It is faster than ordering take-out — genuinely, measurably faster — and it produces results that are better than most restaurant versions in every meaningful way: fresher ingredients, a homemade teriyaki sauce you control entirely, and that perfect glossy glaze that coats the chicken in something deeply savory, slightly sweet, and completely irresistible.
No marinating required. One pan, start to finish. On the table in 15 minutes.
Once you make this Teriyaki Chicken at home, the take-out version stops being the standard you compare everything to. This becomes the standard. Readers who have made it describe it immediately as a “new favorite” — the kind of weeknight recipe that gets put on permanent rotation without any deliberation at all.
A Healthy Weeknight Win
Beyond the speed and the flavor, this Teriyaki Chicken earns its place in a healthy weeknight rotation on nutritional grounds as well. Each serving comes in at approximately 258 calories — a genuinely satisfying, protein-rich meal that does not ask you to sacrifice flavor for the sake of a reasonable calorie count. The homemade teriyaki sauce uses low-sodium soy sauce, honey, and a controlled amount of brown sugar, giving you complete authority over the sodium and sweetness levels in a way that no bottled sauce ever could. It is a mostly healthy meal that tastes like an indulgence — which is the best possible outcome for a Tuesday night dinner.
II. Ingredient Deep-Dive & Smart Substitutions
Every ingredient in this Teriyaki Chicken recipe was chosen for a specific reason. Understanding the role each component plays gives you the knowledge to make confident substitutions and adjustments without compromising the final result.
The Protein: Chicken Breast vs. Chicken Thighs
Boneless, skinless chicken breasts are the standard choice for this recipe — they cook quickly and evenly when cut into uniform 1-inch cubes, and their lean, mild flavor allows the homemade teriyaki sauce to be the dominant flavor presence in every bite. For the 15-minute timeline to work, chicken breasts are the right call.
Boneless, skinless chicken thighs are an excellent alternative for those who prefer a richer, more forgiving protein. Thighs have a higher fat content that keeps them juicy and flavorful even if they are cooked for an extra minute or two, making them ideal for less experienced cooks who are not yet confident about pulling the chicken at the exact right moment. The trade-off is a slightly longer cooking time — add 2 to 3 minutes to the searing step when using thighs, and always verify the internal temperature rather than relying on timing alone.
The Aromatics: Fresh Always Beats Dried
The difference between a Teriyaki Chicken sauce that tastes vibrant and restaurant-quality and one that tastes flat and vaguely generic often comes down to a single variable: fresh ginger and fresh garlic versus their dried, powdered counterparts.
Fresh garlic and freshly grated ginger bring a brightness, intensity, and complexity that dried versions cannot replicate. Dried garlic and ginger powder have their uses in long-cooked dishes where they hydrate and bloom over time — but in a 15-minute recipe where the sauce is added to the pan for less than a minute, they simply do not have enough time to develop their full flavor. The result is a teriyaki sauce that tastes muted and bland rather than alive and aromatic. Use fresh. The extra 60 seconds of grating and mincing is worth every bit of the flavor difference it produces.
The Sauce Components: Building the Perfect Teriyaki
The homemade teriyaki sauce in this recipe is built from four foundational components, each contributing a specific flavor dimension:
Low-sodium soy sauce provides the deep, savory, umami backbone of the entire sauce. Using low-sodium rather than regular soy sauce gives you control over the final saltiness — you can always add more salt, but you cannot take it away once it is in the pan. The soy sauce also contributes the deep mahogany color that gives teriyaki its characteristic appearance.
Honey adds natural sweetness with a floral, slightly complex quality that refined sugar cannot match. It also contributes to the glossy, slightly sticky texture of the finished glaze.
Brown sugar deepens the sweetness and adds a subtle molasses note that gives the teriyaki sauce its caramel-like undertone. The combination of honey and brown sugar produces a more nuanced sweetness than either ingredient alone.
Rice vinegar is the acidic element that balances all that sweetness and keeps the sauce from tasting one-dimensional. Even a small amount of rice vinegar brightens the entire flavor profile and gives the teriyaki sauce its characteristic tangy edge.
The Flavor-Booster Swap: Mirin Over Plain Water
Many teriyaki sauce recipes call for a small amount of water to adjust the consistency of the sauce before it is added to the pan. This recipe takes that step further with a simple but significant upgrade: replace the plain water with a mixture of 2 tablespoons water and 2 tablespoons mirin.
Mirin is a Japanese sweet rice wine with a mild sweetness and a subtle fermented depth that adds enormous complexity to teriyaki sauces. It is what gives restaurant-quality teriyaki that slightly mysterious quality — a flavor note you cannot quite identify but would immediately notice if it were missing. Mirin is widely available in the Asian food aisle of most grocery stores, and a single bottle lasts for many batches of this Teriyaki Chicken recipe. If mirin is unavailable, plain water works — but the mirin upgrade is genuinely worth seeking out.
The Essential Thickener: Cornstarch or Arrowroot
The signature glossy, coating glaze of great Teriyaki Chicken does not happen by accident. It requires a thickening agent — either cornstarch or arrowroot starch — whisked into the sauce before it hits the pan. As the sauce heats and the starch granules hydrate and expand, the liquid transforms from thin and watery to thick, glossy, and clingy in a matter of seconds. Without this step, the sauce slides off the chicken rather than coating it.
Cornstarch is the more readily available option and produces an excellent, reliably glossy glaze. Arrowroot starch is a grain-free, paleo-friendly alternative that produces a slightly clearer, more transparent glaze — it is the preferred choice for those avoiding corn. Both options work in the same quantity in the same way; the choice is entirely a matter of dietary preference and what you have in the pantry.
III. Pro-Level Cooking Instructions
Preparation: The Time-Saving Parallel Approach
The 15-minute timeline for this Teriyaki Chicken recipe is achievable because of one foundational efficiency strategy: whisk the sauce while the chicken cooks. Do not prep the sauce before you start cooking the chicken. Begin cooking the chicken first, and use the searing time to whisk together the soy sauce, honey, brown sugar, rice vinegar, mirin mixture, fresh ginger, fresh garlic, and cornstarch in a bowl. By the time the chicken is seared and ready for the sauce, the sauce is ready to go — and not a single second has been wasted.
Cut your chicken into evenly sized 1-inch cubes before you begin. Uniform sizing is not an aesthetic preference — it is a cooking precision issue. Pieces that are significantly larger or smaller than the others will be undercooked or overcooked by the time the majority of the chicken is done. Consistent 1-inch cubes cook through in the same amount of time, ensuring every piece of chicken is perfectly done simultaneously.
The Searing Technique: Space, Heat, and Patience
The sear is where great Teriyaki Chicken is made or lost, and it hinges on three non-negotiable principles:
Use the right pan. A 12-inch non-stick skillet over medium-high heat is the correct setup for this recipe. The 12-inch diameter provides enough surface area for the chicken pieces to be arranged with adequate space between them — which brings us to the second principle.
Give the chicken space. This is the most commonly violated rule in home stir-fry and sauté cooking, and it is responsible for the majority of disappointing results. When chicken pieces are crowded together in the pan, they trap the steam released during cooking. Steam prevents browning — it is physically impossible for a surface surrounded by moisture to reach the temperatures needed for the Maillard reaction that creates a golden-brown sear. Crowded chicken steams rather than sears, producing pale, soft, somewhat rubbery pieces with none of the caramelized exterior that makes restaurant-quality Teriyaki Chicken so appealing. If your pan cannot fit all the chicken in a single layer with space between pieces, cook it in two batches. It takes a few extra minutes and is absolutely worth it.
Cook to temperature, not time. The chicken is done when the internal temperature at the thickest point reaches 160°F — not when a certain number of minutes have elapsed. Cooking to temperature rather than time is what ensures the chicken is fully cooked without being dry and overcooked. Use an instant-read thermometer and pull the chicken the moment it hits 160°F. The temperature will continue to rise slightly from residual heat, reaching the USDA-recommended 165°F by the time it is plated.
The Finishing Simmer: The Glaze Comes Together
Once the chicken has reached 160°F, pour the prepared teriyaki sauce directly into the pan over the chicken. Toss and stir constantly for 30 to 60 seconds as the sauce heats and thickens around the chicken pieces. This brief but vigorous finishing simmer accomplishes two things simultaneously: it activates the cornstarch thickener to create the glossy, coating glaze that defines great Teriyaki Chicken, and it cooks off any residual raw cornstarch flavor that would otherwise leave an unpleasant starchy taste in the finished dish. Do not skip the full 30 seconds of simmering — the raw cornstarch flavor is real, and it takes heat to eliminate it.
Remove from heat the moment the sauce reaches your desired consistency. The glaze will continue to thicken slightly as it cools, so pull it when it looks marginally thinner than you ultimately want it.

IV. Troubleshooting & Success Tips
How to Avoid a Bland Teriyaki Sauce
A bland Teriyaki Chicken sauce almost always traces back to one of two causes: dried aromatics instead of fresh, or insufficient seasoning adjustment before the sauce hits the pan. After whisking your sauce together, taste it before adding it to the chicken. The raw sauce should taste boldly seasoned — slightly more intense than you ultimately want the finished dish to taste, since it will be diluted slightly by the juices released by the chicken during cooking. If it tastes flat, add more soy sauce for depth, more honey or brown sugar for sweetness, or more rice vinegar for brightness. Season with intention, not with guesswork.
How to Achieve Perfect Browning Every Time
One of the most common mistakes in making Teriyaki Chicken at home is adding vegetables — broccoli, bell peppers, snap peas — to the same pan as the chicken during the searing step. This seems logical from a one-pan efficiency standpoint, but it creates a critical problem: vegetables release significant moisture as they cook, which fills the pan with steam and prevents the chicken from browning properly.
For perfect, golden-brown seared chicken, cook the vegetables separately — either steamed, roasted, or sautéed in a separate pan — and add them to the serving plate alongside the finished teriyaki chicken rather than combining them in the pan. The visual and textural result is dramatically better, and the chicken develops the caramelized exterior that makes this recipe worth making in the first place.
The Uniformity Rule: 1-Inch Cubes, Every Time
Cut every piece of chicken to approximately 1-inch cubes before cooking. This is not approximate — it is precise. Pieces that are too large will be undercooked in the center by the time the exterior is properly seared. Pieces that are too small will overcook and dry out before the others are done. One-inch cubes cooked in a properly heated pan with adequate spacing will be golden on the outside and perfectly juicy at 160°F in approximately 6 to 8 minutes. That is the window this recipe is built around.
V. Serving Ideas & Creative Variations
Classic Teriyaki Chicken Serving
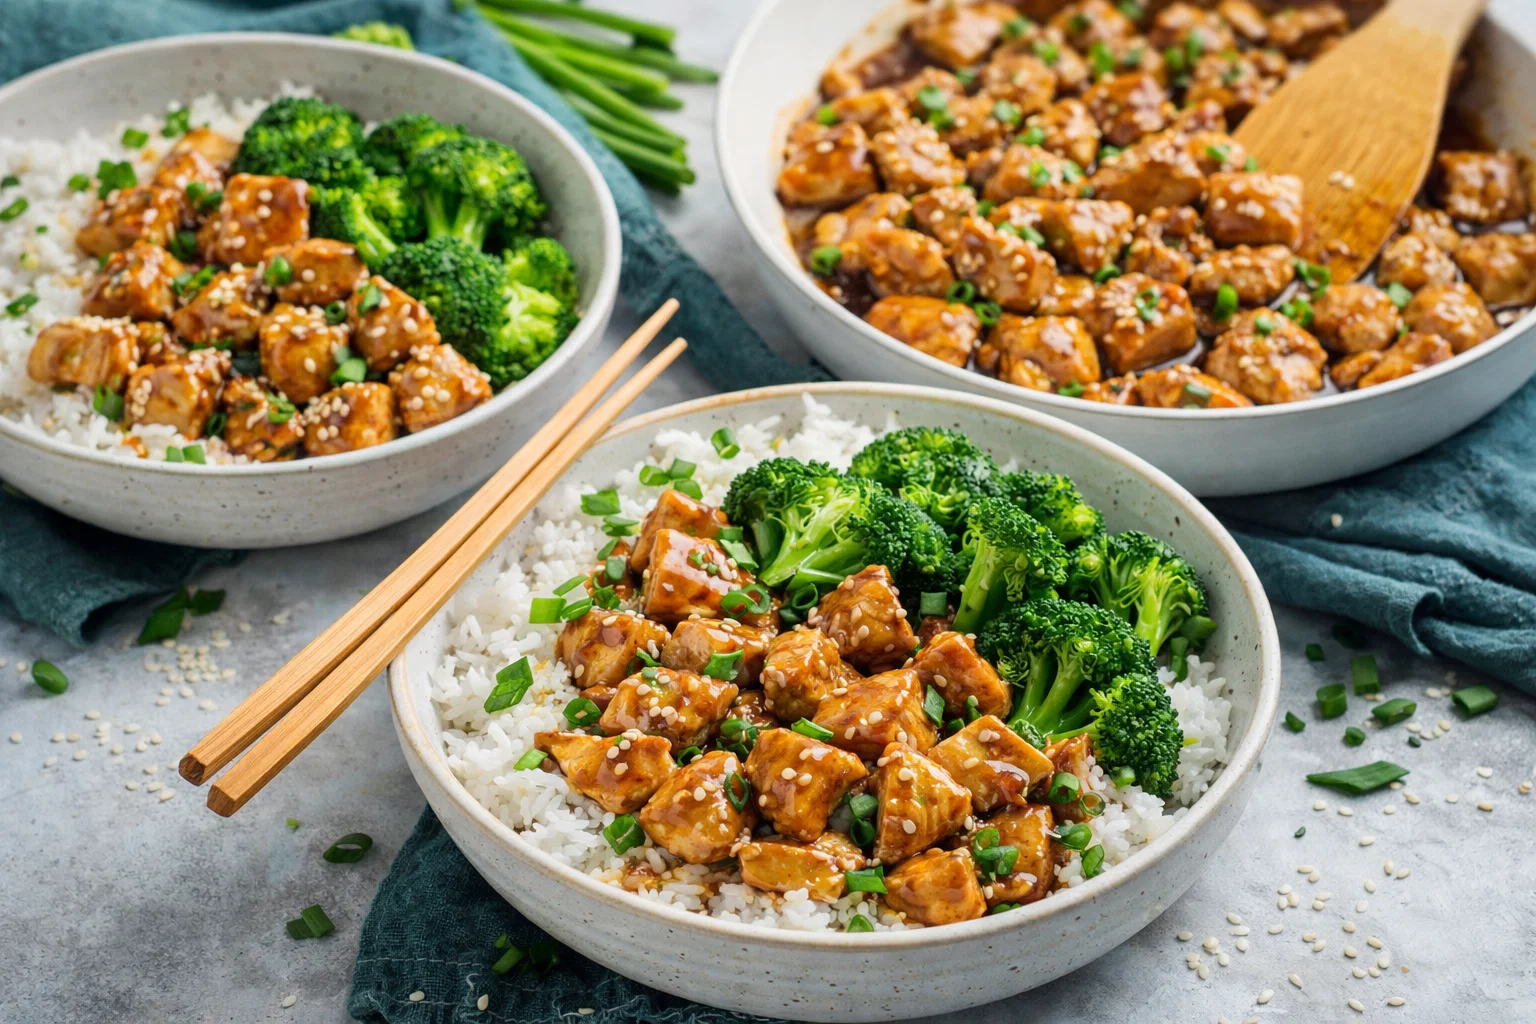
The most traditional and universally satisfying way to serve this Teriyaki Chicken is warm over a bed of steamed white or brown rice with a side of steamed broccoli or asparagus. The rice absorbs the excess teriyaki glaze from the plate, the vegetables provide a fresh, slightly bitter contrast to the sweet-savory chicken, and the whole plate comes together in a way that feels genuinely complete and restaurant-worthy.
Garnishing for Visual Appeal and Texture
Before serving, finish each plate with a scatter of toasted sesame seeds and a handful of thinly sliced green onions. The sesame seeds add a subtle nuttiness and a visual texture that signals care and attention in the presentation. The green onions provide a fresh, bright sharpness that cuts through the richness of the teriyaki glaze. These two garnishes are the difference between a plate of chicken and rice and a plate that looks like it came from a restaurant kitchen.
Explore More Take-Out Favorites
If this Teriyaki Chicken recipe has awakened your enthusiasm for homemade take-out classics, the adventure does not have to stop here. Explore the Orange Chicken recipe for a citrus-forward, crispy alternative with an addictive sweet-and-tangy glaze. Or try the General Tso’s Chicken recipe for a bold, slightly spicy, deeply savory option that is arguably the most popular Chinese-American take-out dish of all time. Both are built on the same homemade-is-better philosophy as this teriyaki recipe — and both are ready in under 30 minutes.
VI. Teriyaki Chicken Recipe Card
Prep Time: 10 minutes Cook Time: 10 minutes Total Time: 15 minutes Yield: 4 servings Calories: Approximately 258 calories per serving
Ingredients
The Chicken:
- 1.5 lbs boneless skinless chicken breasts
  (or thighs), cut into 1-inch cubes
- 1 tbsp neutral oil (vegetable or avocado oil)
- Salt and black pepper to season

The Homemade Teriyaki Sauce:
- ¼ cup low-sodium soy sauce
- 2 tbsp honey
- 1 tbsp brown sugar
- 1 tbsp rice vinegar
- 2 tbsp mirin
- 2 tbsp water
- 3 cloves fresh garlic, minced
- 1 tsp fresh ginger, freshly grated
- 1.5 tsp cornstarch (or arrowroot starch)

For Serving:
- Steamed white or brown rice
- Steamed broccoli or asparagus
- Toasted sesame seeds for garnish
- Sliced green onions for garnish
Instructions
Step 1 — Prep the Chicken: Cut chicken into evenly sized 1-inch cubes. Season lightly with salt and black pepper. Set aside.
Step 2 — Heat the Pan: Heat 1 tablespoon of neutral oil in a 12-inch non-stick skillet over medium-high heat until shimmering and hot.
Step 3 — Whisk the Sauce (while chicken cooks): In a small bowl, whisk together low-sodium soy sauce, honey, brown sugar, rice vinegar, mirin, water, minced garlic, grated ginger, and cornstarch until the cornstarch is fully dissolved and no lumps remain. Taste and adjust seasoning to preference.
Step 4 — Sear the Chicken: Add chicken cubes to the hot pan in a single layer, leaving space between each piece. Do not crowd the pan — cook in two batches if necessary. Sear for 3 to 4 minutes per side without moving, until golden brown on the outside. Check internal temperature — pull at 160°F.
Step 5 — Add the Teriyaki Sauce: Pour the whisked teriyaki sauce over the seared chicken in the pan. Toss and stir constantly over medium-high heat for 30 to 60 seconds until the sauce thickens into a glossy glaze and coats every piece of chicken evenly.
Step 6 — Serve: Remove from heat immediately. Serve warm over steamed rice with vegetables on the side. Garnish with toasted sesame seeds and sliced green onions. Serve immediately.
Nutritional Breakdown (Per Serving)
| Nutrient | Amount |
|---|---|
| Calories | ~258 kcal |
| Protein | ~35g |
| Total Fat | ~6g |
| Saturated Fat | ~1g |
| Sodium | ~680mg (using low-sodium soy sauce) |
| Total Carbohydrates | ~14g |
| Sugars | ~11g |
| Vitamin C | Present (from fresh ginger and garlic) |
Nutritional values are approximate and do not include rice or vegetable sides.
VII. Community Engagement: What Readers Are Saying
Real Results From Real Home Cooks
The most meaningful feedback this Teriyaki Chicken recipe consistently receives is not about technique or timing — it is about the people around the table. Parents report that this recipe has become the solution to the notoriously difficult challenge of cooking for picky toddlers and selective eaters. The mild sweetness of the teriyaki glaze, the tender chicken, and the familiar format of protein over rice make this one of the rare recipes that adults and children both genuinely enjoy without any negotiation.
The comments section of this recipe has grown into a genuinely useful resource for troubleshooting and adaptation. Common questions — whether chicken thighs can be substituted (yes), whether the sauce works with salmon or tofu (absolutely), whether the mirin can be omitted (it can, though the flavor is better with it) — have all been answered and tested by the community.
Share Your Teriyaki Chicken
Made this Teriyaki Chicken recipe at home? We want to see your results. Follow along on social media for step-by-step video content, weeknight dinner inspiration, and the kind of practical, no-nonsense cooking guidance that makes this recipe work every time. Tag your photos so the community can see your version — whether it came out perfectly on the first try or taught you something new along the way.
Leave a rating and review below to help other home cooks find this recipe and feel confident enough to try it for themselves. Every review genuinely matters, and the more specific your feedback — what you changed, what you learned, who you made it for — the more valuable it is to someone making it for the first time.
The best Teriyaki Chicken you have ever had might not come from a restaurant. It might come from a 12-inch skillet, a bowl of whisked sauce, and fifteen minutes on a Tuesday night when you decided to skip the take-out and make something better yourself.