Red Velvet Cinnamon Rolls
Table of Contents
There is a specific kind of morning that calls for something more than ordinary breakfast. Christmas morning, when the house is still quiet and the tree lights are on. Valentine’s Day, when the effort of making something beautiful and slightly indulgent is itself the gesture. The kind of morning where the meal should feel like an occasion — warm, festive, slightly decadent, and genuinely memorable from the first bite.
Thank you for reading this post, don't forget to subscribe!These Red Velvet Cinnamon Rolls were made for exactly those mornings. They take everything that makes red velvet cake so beloved — the deep ruby color that fills a room with visual drama, the subtle cocoa flavor, the slight tang that prevents sweetness from becoming overwhelming — and transform all of it into a pillowy, swirled, icing-draped breakfast roll that looks like it came from a specialty bakery and tastes like the best possible version of both red velvet cake and cinnamon roll simultaneously.
This is the festive red velvet cinnamon roll recipe that has become a Christmas morning staple and a Valentine’s Day tradition in households that have discovered it — the kind of recipe that generates genuine excitement when people see it coming out of the oven, and genuine requests for the recipe before they have finished eating.
The Sneaky Shortcut: Why Use Cake Mix?
Ease and Reliability
The foundation of these easy red velvet cinnamon rolls is a box of red velvet cake mix — and this shortcut is worth understanding rather than apologizing for. The cake mix provides three things simultaneously that would require careful, separate ingredient management in a from-scratch dough: the precisely calibrated cocoa and red food coloring that produces the characteristic ruby color, the leavening and sugar balance that contributes to the soft, tender crumb, and the consistent, reliable result across different kitchens and different bakers. Every box of red velvet cake mix is formulated to deliver the same flavor and color — which means these cake mix cinnamon rolls produce consistent, beautiful results whether you are an experienced baker or making yeasted dough for the first time.
Textural Balance: The Role of All-Purpose Flour
Cake mix alone would produce a batter — fluid, delicate, entirely unsuitable for rolling and shaping into cinnamon rolls. The addition of all-purpose flour is the transformation step that converts the cake batter into an actual dough with the structure, elasticity, and workability that cinnamon rolls require. The flour introduces gluten — the protein network that gives bread dough its characteristic stretch and allows it to trap the carbon dioxide produced by the yeast, creating the rise and the pillowy, soft interior texture. The ratio of cake mix to flour in this recipe is specifically calibrated to produce a dough that is soft and slightly sticky — easier to handle than a stiff, dense dough — while still having enough structure to roll into a clean rectangle, hold its filling, and maintain defined swirl layers after baking.
Essential Ingredients
For the Red Velvet Dough
One box of red velvet cake mix — the hero ingredient that provides color, flavor, and baking chemistry simultaneously. All-purpose flour — added to the cake mix to build dough structure and workability. Active dry yeast or instant yeast — the leavening agent that produces the rise and the characteristic airy, pillowy interior of a proper cinnamon roll. If using active dry yeast it must be proofed in warm water before mixing; instant yeast can be added directly to the dry ingredients. Warm water — at approximately 110°F, the temperature range that activates yeast without killing it.
For the Sweet Cinnamon Filling
The filling of these red velvet cinnamon rolls with cream cheese frosting is built on a classic and perfect combination — brown sugar and ground cinnamon bonded together and adhered to the rolled dough surface with melted butter. Brown sugar provides deeper, more molasses-forward sweetness than white sugar and caramelizes beautifully during baking, creating the sticky, slightly gooey filling layer that is the most essential quality of any great cinnamon roll. Ground cinnamon provides the warm, spiced character that makes the whole roll smell and taste unmistakably like a cinnamon roll regardless of the red velvet dough base.
For the Vanilla Icing
The standard icing for these homemade red velvet cinnamon rolls is a simple, silky vanilla glaze built from confectioners’ sugar (powdered sugar), softened butter, pure vanilla extract, and milk. Use 2% milk for a standard pourable consistency that drizzles cleanly over the rolls in elegant ribbons. Substitute heavy cream for a richer, thicker, more indulgent icing that sits on the rolls in a more substantial layer. The vanilla extract is not optional — it is what prevents the icing from tasting simply like sweetened milk and gives it the warm, aromatic quality that makes it genuinely delicious.
Step-by-Step Baking Masterclass
Step 1: Mixing the Sticky Dough
In the bowl of a stand mixer fitted with the dough hook combine the red velvet cake mix, all-purpose flour, yeast, and warm water. Mix on low speed until the ingredients come together into a shaggy dough — approximately 2 minutes — then increase to medium speed and knead for 4 to 5 minutes until the dough is smooth and cohesive.
Editor’s Tip on Sticky Dough: The dough for these red velvet rolls will be noticeably stickier than standard cinnamon roll dough — this is a characteristic of the cake mix base and is entirely normal. Resist the temptation to add large amounts of additional flour to reduce the stickiness — too much flour produces a dense, tough roll rather than a pillowy, tender one. A light dusting of flour on the work surface and your hands is all that is needed for handling. If the dough is sticking dramatically to the bowl sides after 5 minutes of kneading, add flour one tablespoon at a time until it clears the bowl sides while remaining soft and slightly tacky.
Step 2: The First Rise
Turn the mixed dough out onto a lightly floured surface and knead by hand 6 to 8 times — folding the dough over itself and pressing forward with the heel of your hand each time. This brief hand-kneading develops the gluten structure further and ensures the dough is smooth and elastic before rising. Shape into a ball, place in a lightly oiled bowl, cover with plastic wrap or a clean kitchen towel, and allow to rise in a warm, draft-free location for 2 hours until the dough has doubled in volume. A turned-off oven with just the oven light on, or a spot near (but not on) a warm stovetop, provides the ideal rising environment.
Step 3: Rolling and Filling
Punch the risen dough down to release the gas and turn out onto a lightly floured surface. Using a rolling pin, roll the dough into an 18×10 inch rectangle — work from the center outward in all directions and rotate the dough periodically to maintain an even thickness throughout. If the dough springs back and resists rolling, allow it to rest for 5 minutes — the gluten is tight and needs time to relax before it will cooperate. Brush the entire surface of the rolled dough generously with melted butter — reaching all the way to the edges. Combine the brown sugar and ground cinnamon in a small bowl, then scatter the mixture evenly over the buttered surface — pressing lightly with your hand to help it adhere.
Step 4: The Pro Slicing Hack
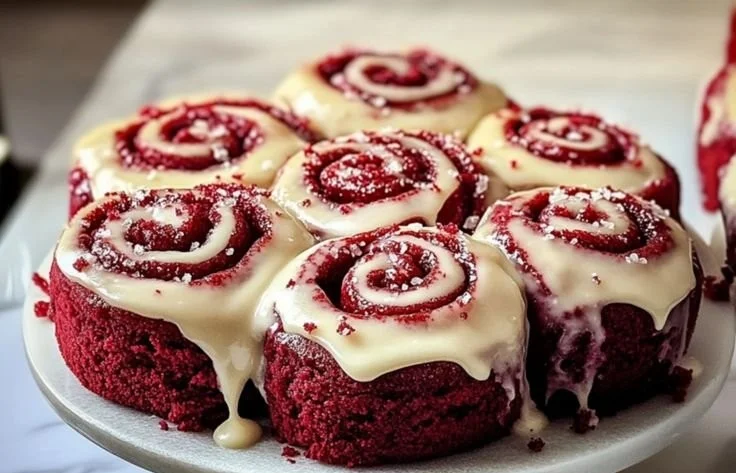
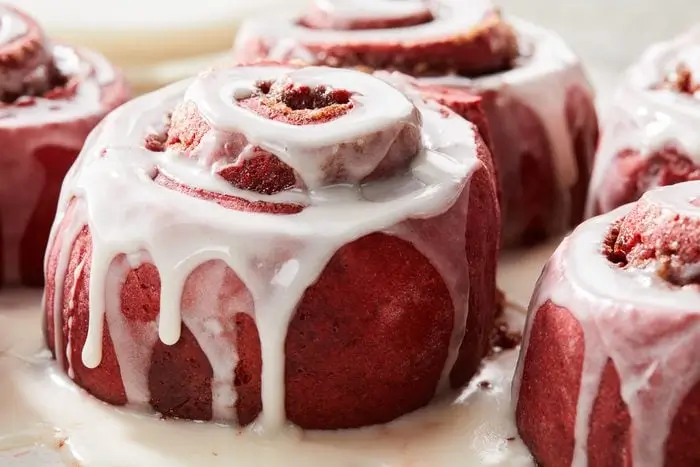
Starting from one of the long edges, roll the filled dough tightly and evenly into a log — keeping the roll as compact as possible without tearing the dough. Pinch the seam closed along the length of the log. Now the most important cutting technique: rather than using a knife — which compresses and distorts the soft dough as it cuts, producing misshapen, “smooshed” rolls — use unflavored dental floss. Slide a length of floss beneath the log at your first cutting point, cross the ends over the top of the log, and pull firmly in opposite directions. The floss cuts through the dough cleanly without any downward pressure, producing 12 perfectly round, evenly sized slices with clean, defined swirl layers. This single technique makes a visible and significant difference in the final appearance of the rolls.
Step 5: The Second Rise and Bake
Arrange the sliced rolls in a greased baking dish — either a 9×13 inch pan or two 9-inch round cake pans — with a small amount of space between each roll to allow for expansion. Cover loosely with plastic wrap and allow to rise for 1 hour until the rolls have puffed noticeably and are beginning to touch each other. Preheat the oven to 350°F (175°C) during the final 20 minutes of this second rise. Bake for 15 to 20 minutes until the rolls are puffed, set throughout, and the tops have developed a light golden-brown color. The interior temperature should reach 190°F if checking with an instant-read thermometer.
Step 6: Glazing at the Right Moment
Allow the baked rolls to cool in the pan for 5 to 10 minutes before adding the icing — this cooling window is more important than it might seem. Icing applied to rolls that are still actively hot from the oven melts completely off the surface and pools in the pan rather than coating the rolls. Icing applied to rolls that have cooled to warm — not hot — flows over the surface in a glossy, even layer, pools attractively in the swirl crevices, and sets to a slightly firm, creamy finish. Drizzle generously and serve warm.

Recipe Variations and Creative Twists
Frosting Swaps: The Cream Cheese Option
For the most authentically red velvet cinnamon roll with cream cheese frosting experience — one that directly references the classic pairing of red velvet cake and cream cheese frosting — substitute a tangy cream cheese frosting for the standard vanilla icing. Beat softened cream cheese with powdered sugar, a splash of vanilla extract, and enough milk or heavy cream to reach a spreadable consistency. The slight tang of the cream cheese against the sweet, spiced filling and the cocoa-inflected dough is the flavor combination that most directly evokes classic red velvet cake and makes these rolls taste the most distinctly red velvet rather than simply red-colored cinnamon rolls.
Alternative Fillings
Beyond the classic cinnamon-brown sugar filling, these festive Christmas cinnamon rolls accept alternative fillings with outstanding results. Dark chocolate chips scattered over the buttered surface before rolling add intense chocolate richness that amplifies the cocoa note in the red velvet dough. Chopped pecans add crunch and a slightly bitter, nutty depth that contrasts beautifully with the sweet filling. Nutella spread over the buttered dough surface in a thin, even layer before the sugar mixture — in the style of a chocolate babka filling — produces an extraordinarily rich, chocolate-hazelnut swirl that makes these rolls genuinely decadent.
Flavor Experiments
The technique developed for these red velvet cake mix cinnamon rolls works with any cake mix flavor — making the entire recipe a template for seasonal and occasion-specific variations. Lemon cake mix produces bright, citrus-scented rolls that are outstanding in spring with a lemon glaze. Strawberry cake mix creates pink rolls that are perfect for Valentine’s Day alongside the red velvet version. Confetti cake mix produces multicolored, celebratory rolls that are ideal for birthday brunches and make children genuinely excited about breakfast.
Mini Version
For a party-friendly, individually portioned format, roll the dough into the same 18×10 inch rectangle but cut the log into 24 smaller slices rather than 12. Bake in a greased mini muffin tin or arrange closely on a parchment-lined baking sheet. Reduce the baking time to 10 to 12 minutes — the smaller portions cook through more quickly.
Make-Ahead, Storage, and Reheating
Overnight Cold-Proof Method
These make-ahead red velvet cinnamon rolls are outstanding candidates for overnight preparation — making them genuinely practical for Christmas morning when the last thing anyone wants is a 3-hour active baking project before opening presents. After cutting and arranging the rolls in the baking dish, cover tightly with plastic wrap and refrigerate for up to 8 hours rather than completing the second rise at room temperature. The cold temperature dramatically slows the yeast activity, producing a very slow overnight rise that develops more complex flavor in the dough. In the morning, remove the dish from the refrigerator 30 minutes before baking to allow the rolls to come slightly toward room temperature, then bake as directed.
Storage Options
Room temperature storage: Wrap cooled rolls tightly in plastic wrap or store in an airtight container at room temperature for 2 to 3 days. Refrigerator storage: Store in an airtight container in the refrigerator for up to 1 week — the rolls firm up in the cold but reheat beautifully.
Freezing Baked Rolls
Baked and completely cooled red velvet cinnamon rolls can be frozen for up to 3 months. Wrap individual rolls tightly in plastic wrap, then place in a freezer-safe bag. Thaw overnight in the refrigerator or at room temperature for 2 hours. Do not freeze unbaked rolls — the yeast activity during freezing is unreliable and produces inconsistent rise results upon thawing.
Reheating for Fresh-Baked Texture
Microwave method: Place one roll on a microwave-safe plate and microwave for 20 to 30 seconds — enough to warm the dough and soften the icing without overheating. Oven method: Place rolls in a baking dish, cover with aluminum foil, and warm at 300°F for 10 to 12 minutes. The oven method produces a result closest to freshly baked and is the best option when reheating multiple rolls simultaneously.
Troubleshooting FAQ
Why Didn’t My Rolls Rise?
The most common cause of cinnamon rolls that fail to rise is yeast that is no longer active — either expired, killed by water that was too hot (above 115°F), or simply old. Check the expiration date on your yeast package before beginning. To test yeast viability before committing it to a full batch of dough, combine the measured yeast with the warm water and a pinch of sugar and wait 5 to 10 minutes — active yeast will produce visible foam and bubbles on the surface. No foam means the yeast is not active and the rolls will not rise regardless of how long they rest. Replace the yeast and begin again.
Springy Dough That Keeps Shrinking
If the dough springs back and contracts while you are trying to roll it into the 18×10 inch rectangle, the gluten in the dough is tight and overworked — it needs to relax before it will cooperate with the rolling pin. Cover the dough with a clean kitchen towel and allow it to rest at room temperature for 5 to 10 minutes. The gluten relaxes during this rest and the dough will roll out significantly more easily afterward. Do not force the dough by pressing harder with the rolling pin — working against tight gluten produces tearing rather than stretching.
Completing the Brunch Spread
Savory Pairings
The richness and sweetness of these red velvet breakfast rolls is beautifully balanced by a savory accompaniment that provides contrast and makes the overall brunch feel like a complete, satisfying meal rather than just a dessert course served at breakfast. A classic quiche — whether Lorraine with bacon and Gruyère, or a simple spinach and feta version — provides protein, savory depth, and a warm, egg-based richness that complements the sweet rolls without competing with them.
Light Sides
For a brunch spread that feels fresh and vibrant alongside the indulgent rolls, tropical fruit salad — mango, pineapple, kiwi, and fresh mint with a squeeze of lime — provides bright acidity and cooling freshness that makes the warm, sweet rolls taste even better by contrast. A berry smoothie — blended frozen mixed berries with yogurt and a drizzle of honey — offers a portable, refreshing option that guests can enjoy while the rolls come out of the oven and rounds out the spread with color and nutrition.